HOT HEAD BLACK NEBULA REDUCTION TUTORIAL by DeAnne Buchanan/The Glass Zone
(All material contained within this Tutorial is protected by Copyright, "The Glass Zone" DeAnne Buchanan, 2008; all rights reserved.)
After much prompting, Im FINALLY posting my Tutorial on how to get an excellent reduction flame on a Hot Head Torch. This demonstration features George Tessmans Black Nebula glass, one of my all time favorites!!! Bear in mind that although a Striking flame is difficult if not impossible to establish on a Hot Head Torch, a Reducing flame, as demonstrated here, works wonders with all Reduction glass Black Nebula, Iris Blue, Iris Yellow, Di Vinci, Olympia Rain, and many more!
Special thanks to my daughter, Kira, for her photography skills (without whose help this Tutorial would NEVER be), to Irene (Reenie) of Flame Kissed Glass (
http://www.flamekissedglass.com/) and to Mr. George Tessman of GT Glassworks, for creating and producing his wonderful Black Nebula for the lampworking world! (
EDIT: August 2012/"Black Nebula" is no longer available but this technique works great with lots of different and still-available glasses! If you're lucky, you may be able to find some old stock Black Nebula around. If so, grab it!)
SUPPLIES, SUGGESTIONS AND IMPORTANT CAUTIONS:
As you all know, safety while working with hot glass is of the utmost importance!!! Because this technique requires covering the intake holes of your Hot Head Torch, Id like to make the following recommendations and suggestions for the best result under the safest circumstances:
1. Above all, use sensibility and care!!!
PROPER VENTILATION IS A MUST (ESPECIALLY WHILE WORKING WITH SILVER GLASS!)
2. Even though a reduction flame can be achieved on a Hot Head torch using a tin foil collar which can be slid up the shaft of the torch (and thus covering the oxygen intake holes and yielding a fuel rich flame) I find this technique variable and sometimes insufficient. Therefore, for my purposes as demonstrated in this Tutorial, I utilize a Leather Welders Glove with Kevlar stitching which is pictured below. I find that using the Glove technique offers virtually complete coverage of the holes, and proffers a consistent, wonderful fuel rich flame that cant be beat! The glove manufacturer (in this case, Lincoln Electric) is not as important as the flame and heat resistance. This particular glove is not intended to withstand direct contact with the flame, but is sufficient to protect your hand while covering the holes on the Hot Head for approximately 25-35 seconds at a stretch, which is more than sufficient to evoke the silver/metallic surface effect with Black Nebula and other reduction silver glasses.
3. I purchased these gloves from my local Home Depot, and you should be able to find them readily in your area; they can also be purchased from
www.homedepot.com. (EDIT: March 2009/These gloves are sometimes seen in a Red color as opposed to the Grey that is shown. Either will be sufficient, so don't worry if they look a bit different at your local Home Depot. Just make sure they are heavy-duty, "heat resistant" and intended for welding purposes.)
4. Remember that all that is needed is ONE GLOVE, which should be for your NON-DOMINANT HAND your dominant hand will be holding the mandrel & bead in the flame, and you will be using your other GLOVED hand to cover the Hot Head intake holes. For reference purposes, please note that I am LEFT HANDED, thus, the Glove goes on my RIGHT HAND.
5. If you use 1# MAPP or MapPro canisters with your Hot Head, be sure to start with a new, full (or nearly full) canister to insure that you have plenty of fuel to create your bead and evoke the reduction flame without risk of running out of fuel right before you are finished!
6. First, make sure all your supplies are within reach! I keep my glove on my lap, with the opening facing the hand that youll be putting it on this way, its easy to just slide your hand right in there when youre ready to do your reduction. All pressing, shaping, etc. should be done in advance of the reduction, which will be the very last step before placing the bead into the kiln or vermiculite filled crock pot.
7. So as not to lose your reduction effect, which is a surface treatment of your glass, I suggest annealing your bead on the lower end of the heat spectrum. I kiln anneal my beads, and set my kiln to never exceed 940 degrees throughout the entire annealing cycle.
A photo of the "Lincoln Electric" Leather, Heat Resistant, Kevlar stitched glove I use:
READY? OK LETS GET STARTED!!!!!
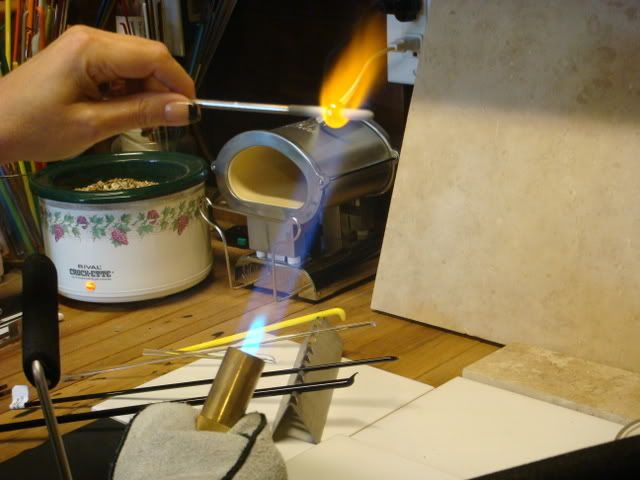
Start by heating your mandrel and winding your base bead. I am using a 5/32 mandrel, and will be winding a donut-shaped Big Hole Bead for my Pandora bracelet.
After winding your basic bead, this is the point where you want to press or otherwise shape your bead. Im using a couple of graphite marvers (one right in the flame) and one flat on my work bench just to even up the beads donut shape.
You might see a bit of luster appear on the glass at this point, but this is NOTHING compared to what can be achieved.
NOW FOR THE FUN PART! Slide your NON-DOMINANT hand into your glove; be sure to keep your bead warm at the back of the flame so you dont have any cracking issues.
CAREFULLY use your glove to cover ONLY THE INTAKE HOLES ON THE HOT HEAD. This will cause the customary Hot Head noise to reduce considerably from the lack of oxygen, and the resulting flame will be a wonderful, bushy PURE FUEL flame. (Notice how ALL the holes are covered by the glove, all the way around!) BE SURE TO BE VERY CAREFUL NOT TO SLIDE YOUR GLOVED HAND ANY FURTHER TOWARD THE FLAME THAN JUST WHERE THE HOLES ARE LOCATED.
Bring your bead into the mid-range of this flame, and quickly roll it around to hit all sides of the bead. You will IMMEDIATELY SEE the Silver bloom on the surface of the glass!!! Gorgeous! Keep in mind that a very quick exposure to the Reduction Flame will cause a metallic iridescent coating on the surface of the glass; the longer you expose the bead to the Reduction Flame, the lighter color (peacock blue) the surface will turn. If you over reduce, simply remove your glove from the intakes, put the bead back into a neutral flame (turns the glass back to basic black) and try again. I prefer a very quick exposure, which is what Ive done with the bead demonstrated.
REMEMBER that you will begin to feel the heat through the glove within about 20-30 seconds, and if your hand starts getting hot, remove your gloved hand from the Hot Head (you can keep the glove on, unless of course, its on FIRE just kidding!), give it a moment to cool down, and then repeat the process if necessary.
Once youve achieved the look you want, slowly cool the bead in the very back of the neutral flame, being sure not to bring it into full flame or you will lose your reduction effect. At this point, pop it into your kiln or after a couple of moments of slow flame annealing (remember, back of the flame only), push it down into your vermiculite and allow it to cool down slowly.
Heres a shot of how the glove looks covering the holes completely (this is how you want to cover the holes only with the torch ON):
Heres a few shots of how the finished bead looks (NOTE: These were super "quickie" shots my daughter took indoors - although it looks like just a "patch" of the bead is super mirror shiny, in actuality, the entire bead is this reflective):
NOW GO GET YOUR BLACK NEBULA AND FLAME ON!!! I hope you enjoyed this tutorial; I would love feedback and input, and will be happy to try and answer any questions or concerns you might have. If you are so inclined, Id LOVE you to post your beads here, too!!!
Hugs from CA,
DeAnne/theglasszone
All rights reserved; this Tutorial may not be transmitted or duplicated, in part or whole, without the permission of the author.