

|
| Boro Room -- For Boro-related tips, techniques, and questions. |

2010-11-18, 12:26pm
|
 |
Curmudgeon Engineering
|
|
Join Date: Feb 15, 2006
Location: Near Seattle, WA
Posts: 1,723
|
|
Nicely done deb.
I usually don't put lines any closer to the rim than about 2/3 from the center. I find my flower gets to big in diameter, sort of flattens out, and sometimes actually touches the marble side when I don't do it just right....often. Remember that the distance from center determines the height of the elements from the bottom when done. I do however, alter the 'time' some elements are put on to adjust that height; such as putting the staymen or flower center in after some imploding is done so they/it stays low in the flower's center.
The dark plum is a good combination. Try Blackberry over white and Experimental Green #5 over white or yellow or red.
|
2010-11-18, 3:21pm
|
|
Glassmangler
|
|
Join Date: Oct 04, 2009
Location: Austin, TX
Posts: 230
|
|
Sorry for the huge pic. This is an undersea implosion, but the principle is identical. I put dots/lines all the way out to the edge of the maria.
|
2010-11-19, 4:47pm
|
 |
Senior Member
|
|
Join Date: Jan 07, 2008
Location: Gloucestershire, UK
Posts: 714
|
|
Quote:
Originally Posted by cheng076

Nicely done deb.
I usually don't put lines any closer to the rim than about 2/3 from the center. I find my flower gets to big in diameter, sort of flattens out, and sometimes actually touches the marble side when I don't do it just right....often. Remember that the distance from center determines the height of the elements from the bottom when done. I do however, alter the 'time' some elements are put on to adjust that height; such as putting the staymen or flower center in after some imploding is done so they/it stays low in the flower's center.
The dark plum is a good combination. Try Blackberry over white and Experimental Green #5 over white or yellow or red.
|
Ahhh.... now I understand why my petals are flat...  Thank you
__________________
Bob Cat and 2 oxycons
To view links or images in signatures your post count must be 5 or greater. You currently have 0 posts.
|
2010-11-19, 7:03pm
|
|
Senior Member
|
|
Join Date: Jan 29, 2009
Posts: 1,958
|
|
Brilliant advise as always had to take a break from implosions and make some Christmas ornaments. So little time and so much glass to melt gotta love it!
|
2010-11-20, 10:27am
|
|
Curmudgeon Engineering
|
|
Join Date: Feb 15, 2006
Location: Near Seattle, WA
Posts: 1,723
|
|

I'll mention a couple of other technique things here. I usually strive to have the upper level of my petals at the equator of the finished marble when viewed from the side; that way the flower 'fills' the view when looked at from above the marble without falling off the edges. Does that make sense? With some looks such as having long upright stamen or extended flower parts you don't want this so work accordingly. I've seen Kabuki 'reach' into the marble from the lens side to grab the stamen and pull them up almost to the top of the lens.
I also notice that a lot of beginners end up with their flowers being 'stubby' on the bottom; that is, not comming down to a fine point. The trick here is when your implosion is almost completed and you have that last dimple on the maria face let the marble cool somewhat and then heat just the area around that dimple and down into the dimple. When it is nice and hot, reach in to the bottom of the dimple with a 3mm or 4mm clear rod and grab the bottom and the dimple sides and pull it out. What you want is to pull the bottom out and stretch the bottom part of the petals down into a point AND pull some of the maria edge glass with them. this will also allow you to pull out any air trapped along the lower petals. Pull this glass out and swipe it off untill you have a nice short stubby cone with a good straight petal color termination down the center of the cone. Holding the marble horizontal you then heat the whole gather and let it form a sphere and start rounding out.
|
2010-11-20, 11:23am
|
 |
Life is good
|
|
Join Date: Jan 22, 2010
Location: New Jersey
Posts: 796
|
|
I'm so glad I subscribed to this thread. I have learned so much. Thanks to everyone that has contributed. And very nice work Deb.
__________________
Peace
Dave
To view links or images in signatures your post count must be 5 or greater. You currently have 0 posts.
To view links or images in signatures your post count must be 5 or greater. You currently have 0 posts.
|
2010-11-20, 12:43pm
|
|
Senior Member
|
|
Join Date: Jan 07, 2008
Location: Gloucestershire, UK
Posts: 714
|
|
The more I read, the more I understand - now putting it into practise is another matter, but at least I understand what I 'should' be doing..
Thank you once again
Here's another implosion/marble question.... how exactly do you use a marble mold... mine seem to end up oval, rather than round, so obviously Im doing something wrong - well that's not unusal for me
__________________
Bob Cat and 2 oxycons
To view links or images in signatures your post count must be 5 or greater. You currently have 0 posts.
|
2010-11-20, 1:07pm
|
|
Never give up
|
|
Join Date: Dec 22, 2007
Location: Nashville , IN 47448
Posts: 949
|
|
Target type multi layered stringers make petals with colored edges different from the petal center. Try 3 or 4 layers.
When you do the layers how do you apply them. In rod form or do you cut the rod in small disks, or do you use lines? I have been doing pendants for awhile, and I not good at figuring out what I do wrong or right, and how I got what I got. Thanks
__________________
Kim
|
2010-11-20, 3:45pm
|
 |
Senior Member
|
|
Join Date: Apr 15, 2009
Location: Far side of the screen
Posts: 412
|
|
Use heat and gravity to get your marble as round as possible then use the marble mold by getting glass hot, but not so hot that the center is mushy, and roll one side in a mold that is just a bit smaller than your finished marble watch the edge of the mold for gaps that will tell you where your marble is not round. Keep heating and rolling until round. Once you are satisfied with the first side switch punty to the other side and roll it again. The mold will help you to get your mable round and then use flame to polish out any little spots or marks.
To make target type multi layered stringers just encase your starting color rod with another color. I start by getting my rod warm and then striping color on to rod starting at the end and drawing downward. then when it is cover i punty up to end get it good and hot, marver a few times to make smooth then heat and pull.
|
2010-11-20, 10:18pm
|
|
Curmudgeon Engineering
|
|
Join Date: Feb 15, 2006
Location: Near Seattle, WA
Posts: 1,723
|
|
cakelady,
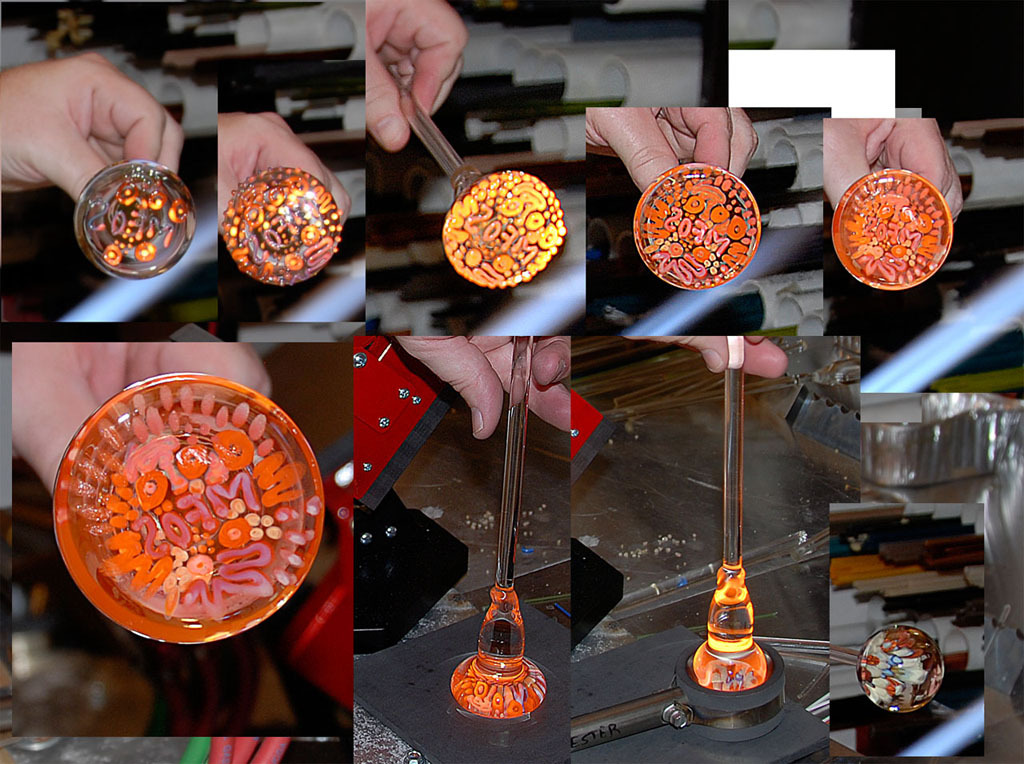
The stringer is multi layered; say a white center covered with an orange layer then a dark cobalt layer melter all in and pulled to about 2mm or 3mm. When you put the stringer onto the marias face you simply draw lines with the stringer. No need to make layers onto the maria. When the stringer implodes/condences it will stretch and sort of smear and will show a petal that has a white center with an orange rim and a cobalt rim around the whole thing. It acts sort of like what you would see if you made an angle slice thru the stringer and stretched and flattened it out. If you look deep into the flower after it's done you will see that the cobalt and red 'rims' are still there but deep down at the bottom of the petal. JMeader's pic shows the effect well. As you can see the plum has stretched down along the petals to the very bottom but is still on the 'rim' of the petal.
|
2010-11-20, 10:28pm
|
|
Senior Member
|
|
Join Date: Jan 29, 2009
Posts: 1,958
|
|
Sweet I gotta try that.
|
2010-11-20, 10:44pm
|
|
Curmudgeon Engineering
|
|
Join Date: Feb 15, 2006
Location: Near Seattle, WA
Posts: 1,723
|
|
effemess,
Here's exactly how I use a marble mold. I have the common hemispherical molds so will describe their use. I almost never use the bottom or cup portion of the molds, just the rim. I use a mold size that is about 2/3 or 3/4 the size of the glass gather. When I have my petals imploded and the maria is semi-spherical using surface tension and gravity I get the whole mass quite hot but not saggy hot. I pull it out of the flame and let it cool 5 or so seconds to form a 'skin' on the glass. I touch it gently into the mold at 45 deg angle while simultaneously spinning it. As it makes contact with the mold I lift the punty up to verticle and down to almost horizontal, spinning all the time. I do this several times. I let the mold rim work on the gather until the larger unused part of the original glass blank touches the rim, almost 3/4 of the sphere in most cases. The mold will tell you when it is round as it will start to turn very smoothly and have a kind of a slight 'drag'. This is not the drag of softened glass bunching up and catching but a velvety 'hesitation sliding thing' that you will recognize when you fine it. Also watch the reflections of lights near/over your bench on the marble surface. These light reflections will 'jump' as you spin the nonround marble and get smoother and smoother as you get rounder and rounder. As you are doing this let the core temp drop to get some stability because from now on you are mostly concerned with the surface portion. When done on this bottom side fire polish this side and punti up to the bottom. Now melt off the extra glass from the blank and use the mold the same way to do the lens side. When satisfied drop off the punti and fire polish/melt in the punti mark.... put in kiln and wait 
One thing I have over my bench that is a great help is a fluorescent tube light. The long light ribbon reflection easily points out bad spots as the reflection will distort when you hold the marble up and turn it.
|
2010-11-20, 10:57pm
|
|
Curmudgeon Engineering
|
|
Join Date: Feb 15, 2006
Location: Near Seattle, WA
Posts: 1,723
|
|
The last post dropped of a final comment.
One thing I find very helpful is a fluorescent light. The reflection of the long tube forms a long bright line on the marble surface that distorts when you rotate a bad spot past it. Easy to spot where you need to round up more.
|
2010-11-20, 11:01pm
|
|
Curmudgeon Engineering
|
|
Join Date: Feb 15, 2006
Location: Near Seattle, WA
Posts: 1,723
|
|
What happened??? Now the comment is there... wierd.
|
2010-11-21, 7:38am
|
 |
Heart of Flame
|
|
Join Date: Apr 28, 2010
Location: Ontario, Canada
Posts: 163
|
|
Thanks so much for all your information Cheng076! I am a newbie both in soft glass and boro but love doing implosions. I have been trying to improve the look of my marbles and your information helps greatly!
__________________
Darryle
If you wish to learn the highest truth, begin with the alphabet - Japanese Proverb
To view links or images in signatures your post count must be 5 or greater. You currently have 0 posts.
|
2010-11-21, 8:14am
|
|
Life is good
|
|
Join Date: Jan 22, 2010
Location: New Jersey
Posts: 796
|
|
Excellent information, and explained with great detail. Insight that is truly invaluable. Thank you so much. If you don't already have a book or tutorial, you should seriously consider it.
__________________
Peace
Dave
To view links or images in signatures your post count must be 5 or greater. You currently have 0 posts.
To view links or images in signatures your post count must be 5 or greater. You currently have 0 posts.
|
2010-11-21, 9:02am
|
|
Never give up
|
|
Join Date: Dec 22, 2007
Location: Nashville , IN 47448
Posts: 949
|
|
Thanks cheng076 helpful information. I have got to try it. Thanks again.
__________________
Kim
|
2010-11-23, 8:17pm
|
 |
Surrounded by Trouble
|
|
Join Date: Jun 05, 2005
Location: Alabama
Posts: 14,165
|
|
Quote:
Originally Posted by Shawn T
Cheng,
If we had rep point here you would get all of mine.
Awesome information and explanation of different implosion techniques.
|
I know I am repeating and quoting myself here.
But besides saying Thank You Cheng! I would also like to note that I personally think this is the best thread on implosions or the compression technique that has ever been posted on LE.
Once again Thank you Cheng for so freely giving out this information,
for answering questions and being so kind with your knowledge.
I do agree if you ever do decide to write a book, a tutorial, a DVD or a PDF, I would be first in line to purchase a copy. Your clear, concise instructions and explanations already have me hooked and wanting more.
__________________
"Out beyond ideas of wrongdoing and rightdoing, there is a field. I'll meet you there." Rumi
To view links or images in signatures your post count must be 5 or greater. You currently have 0 posts.
To view links or images in signatures your post count must be 5 or greater. You currently have 0 posts.
To view links or images in signatures your post count must be 5 or greater. You currently have 0 posts.
|
2010-11-24, 2:54am
|
|
Senior Member
|
|
Join Date: Jan 07, 2008
Location: Gloucestershire, UK
Posts: 714
|
|
Once again - thank you.. Now I realise why my marbles aren't round...because Im trying to push them in the mold....
__________________
Bob Cat and 2 oxycons
To view links or images in signatures your post count must be 5 or greater. You currently have 0 posts.
|
2010-11-24, 5:14am
|
 |
Senior Member
|
|
Join Date: Jun 15, 2007
Location: Powell Ohio
Posts: 423
|
|
If anyone needs help with soft glass flowers I'd be glad to help. Dan G
 
|
2010-11-24, 6:18am
|
 |
birdergirl ~o~
|
|
Join Date: May 17, 2006
Location: Unorganized Territory
Posts: 2,002
|
|
Beautiful!
Is the process much different for soft glass I'm just trying tiny off madrel implosions.
__________________
To view links or images in signatures your post count must be 5 or greater. You currently have 0 posts.
To view links or images in signatures your post count must be 5 or greater. You currently have 0 posts.
To view links or images in signatures your post count must be 5 or greater. You currently have 0 posts.
To view links or images in signatures your post count must be 5 or greater. You currently have 0 posts.
~raised by wolves~sleeps with foxes~cooks for crows~feeds the bears~scrabbles with squids~antisymmetrical~politically agnostic.
To view links or images in signatures your post count must be 5 or greater. You currently have 0 posts.
Torchering glass since spring '06~ gold cricket & oxycon!~
|
2010-11-24, 6:22am
|
|
Glassmangler
|
|
Join Date: Oct 04, 2009
Location: Austin, TX
Posts: 230
|
|
Quote:
Originally Posted by cadia
Beautiful!
Is the process much different for soft glass I'm just trying tiny off madrel implosions.
|
Soft glass melts way faster . Other than that, the technique is the same.
|
2010-11-24, 8:24am
|
|
Senior Member
|
|
Join Date: Jan 29, 2009
Posts: 1,958
|
|
Those are beautiful Dan.
|
2010-11-24, 11:14am
|
|
Curmudgeon Engineering
|
|
Join Date: Feb 15, 2006
Location: Near Seattle, WA
Posts: 1,723
|
|
Dan,
I love the two marbles you posted in post #50. Reds and oranges are my favorite colors to work with. I just wish the boro versions were not so 'boily'. Thanks for shareing those mibs.
|
2010-11-24, 8:48pm
|
|
Senior Member
|
|
Join Date: Jun 15, 2007
Location: Powell Ohio
Posts: 423
|
|
Thanks everyone I owe it all to John K he is the best.I'm going to try boro soon but it's like working at half speed. It takes so long to get it to start moving. Dan
|
2010-11-25, 5:27am
|
|
Never give up
|
|
Join Date: Dec 22, 2007
Location: Nashville , IN 47448
Posts: 949
|
|
Quote:
Originally Posted by DanG
If anyone needs help with soft glass flowers I'd be glad to help. Dan G
|
I really need help. I know Iam close but not close enough. If you don't mind I would LOVE the help.
__________________
Kim
|
2010-11-25, 5:52am
|
|
Senior Member
|
|
Join Date: Jun 15, 2007
Location: Powell Ohio
Posts: 423
|
|
|
2010-11-25, 6:01am
|
|
Never give up
|
|
Join Date: Dec 22, 2007
Location: Nashville , IN 47448
Posts: 949
|
|

These are my pendants. I want to know how you get the beautiful layers in your flowers. I just can't seems to get it.
__________________
Kim
|
2010-11-25, 7:47am
|
|
Glassmangler
|
|
Join Date: Oct 04, 2009
Location: Austin, TX
Posts: 230
|
|
A pendant isn't going to have the same depth as a marble unless it is a round pendant (not flat backed). If you look at Dan's flowers, about half of the depth is from tapering and pulling (either by hand or with gravity) the stem and petals down to a point.
Looking at your examples Kim, it looks like that when you're flattening the bottom, the petals are being smashed up into a cool layer of glass above them in the maria and 'squishing' flat. Spend a little more time keeping the entire maria hot so that the petals open naturally. (I like the squished look on frit implosions however).
To get more 'layers', maybe hold off on adding the second set of petals until you've got the first set worked in? The further 'away' from the initial dots your next layer is on the maria, the more space between the two sets of petals.
|
2010-11-25, 11:10am
|
|
Never give up
|
|
Join Date: Dec 22, 2007
Location: Nashville , IN 47448
Posts: 949
|
|
Quote:
Originally Posted by JesterGlass
A pendant isn't going to have the same depth as a marble unless it is a round pendant (not flat backed). If you look at Dan's flowers, about half of the depth is from tapering and pulling (either by hand or with gravity) the stem and petals down to a point.
Looking at your examples Kim, it looks like that when you're flattening the bottom, the petals are being smashed up into a cool layer of glass above them in the maria and 'squishing' flat. Spend a little more time keeping the entire maria hot so that the petals open naturally. (I like the squished look on frit implosions however).
To get more 'layers', maybe hold off on adding the second set of petals until you've got the first set worked in? The further 'away' from the initial dots your next layer is on the maria, the more space between the two sets of petals.
|
Wow I have to try that. Thanks hope I have time today. All of a sudden its starting to make since. Thanks again.
__________________
Kim
|
|
Currently Active Users Viewing This Thread: 1 (0 members and 1 guests)
|
|
|
 Posting Rules
|
You may not post new threads
You may not post replies
You may not post attachments
You may not edit your posts
HTML code is Off
|
|
|
All times are GMT -7. The time now is 3:45am.
|


