

|

2008-10-29, 7:26am
|
 |
Senior Member
|
|
Join Date: Jan 11, 2007
Location: Eastern NC.
Posts: 4,304
|
|
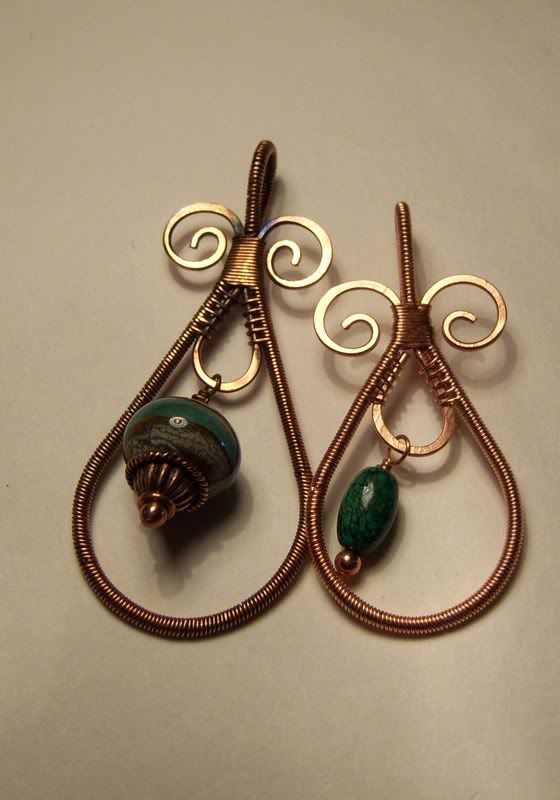
 My first tutorial! Wire wrapped pendant.
This is my first tutorial ever and I know it needs alot of work but I hope you can have fun with it. This tutorial is for a wire wrapped pendant that I made. You have all help me in in some way or other and I want to give you all something in return. Thank you for being here for me. 
You can download it here. http://www.rusticstudio.com/downloads_home.htm Thank you Patty!
Supplies:
.Ruler
.file
.round nose pliers
.chain nose pliers
.flat nose pliers
.tweezers
.dental pick
.chasing hammer
.anvil or steel block
.sharpie marker
. 2 dowel rods. One measuring 3/4 inch in diameter and one measuring 1/4 inch in diameter. You can use anything round with those measurements. I like to use my dapping tools for this.
.8 inches of 18 gauge copper or sterling silver wire(dead soft) for smaller pendant and 9 inches for the larger pendant.
73 inches of 26 gauge copper or sterling silver wire (dead soft) for smaller pendant and 84 inches for larger pendant.
. Beads for center dangle in the pendant. I used a 13 x 7mm lampwork bead for my large pendant and a 6mm x 9mm stone bead for the small pendant. You can also use bead caps and smaller beads to accent your dangle.
. 1 - 2 inch head pin.
STEP #1.
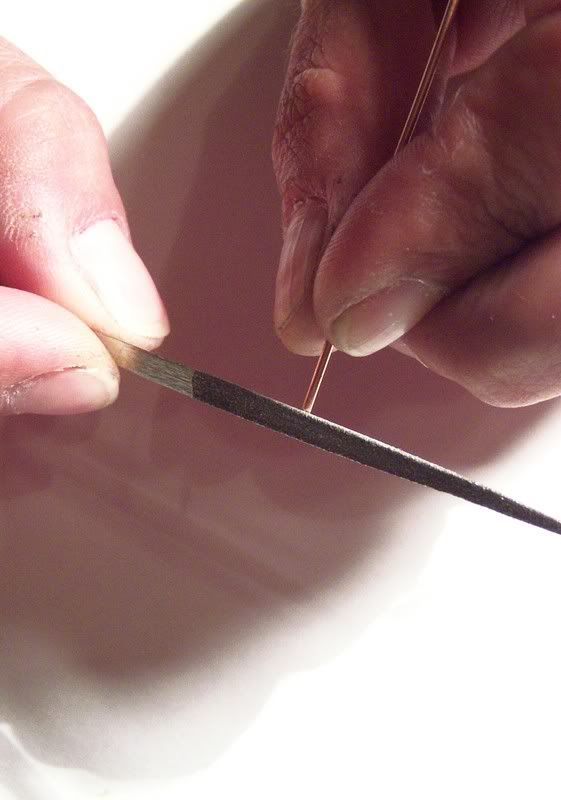
Cut 1 piece of 18 gauge wire 5 1/2 inches long for small pendant or 6 1/2 inches for large pendant. File the ends smooth removing any sharp edges and points.
__________________
Jewlie or Julie, its all the same.
To view links or images in signatures your post count must be 5 or greater. You currently have 0 posts.
To view links or images in signatures your post count must be 5 or greater. You currently have 0 posts.
To view links or images in signatures your post count must be 5 or greater. You currently have 0 posts.
My Facebook
|
2008-10-29, 7:34am
|
|
Senior Member
|
|
Join Date: Jan 11, 2007
Location: Eastern NC.
Posts: 4,304
|
|
STEP # 2.
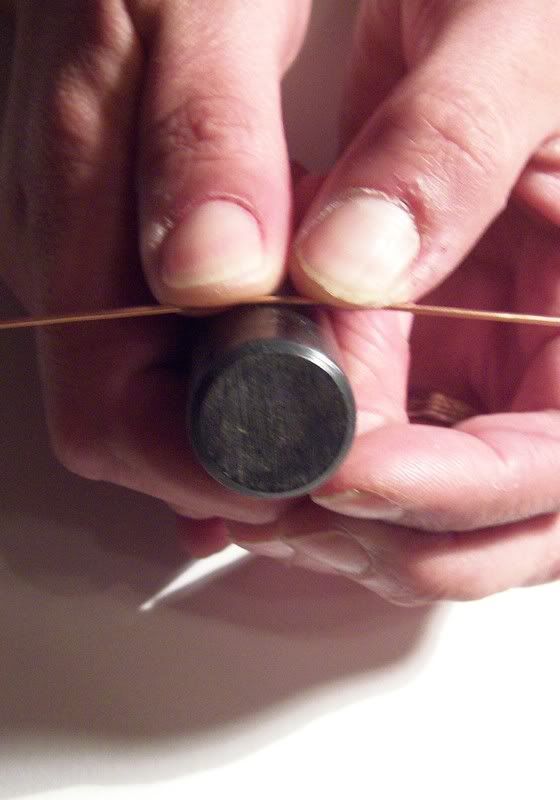
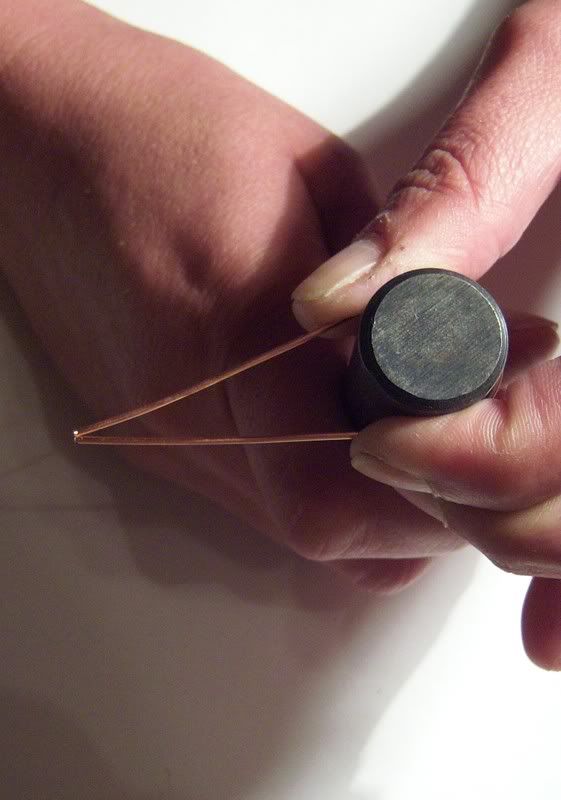
Using your dowel or tool measuring 3/4 inch in diameter, center your 18 gauge wire over the rod and bend until both ends meet. You will have a tear drop shape.
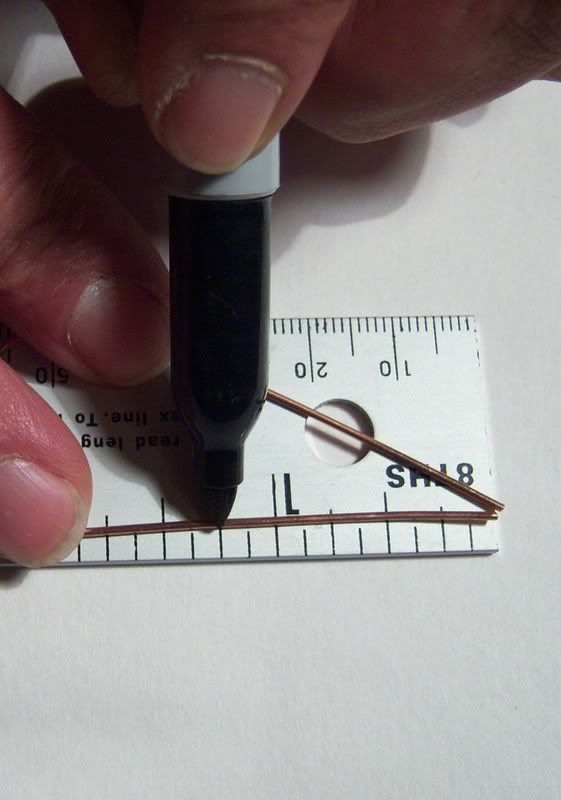
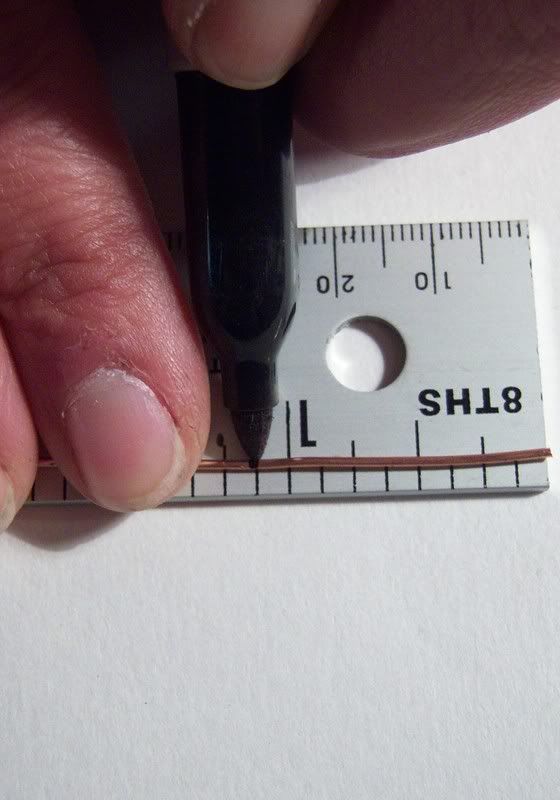
STEP # 3.
With your ruler and sharpie, measure both ends of wire and mark 1 1/8 inch from end. This will give you a stopping point when you make your swirls.
__________________
Jewlie or Julie, its all the same.
To view links or images in signatures your post count must be 5 or greater. You currently have 0 posts.
To view links or images in signatures your post count must be 5 or greater. You currently have 0 posts.
To view links or images in signatures your post count must be 5 or greater. You currently have 0 posts.
My Facebook
|
2008-10-29, 7:37am
|
|
Senior Member
|
|
Join Date: Jan 11, 2007
Location: Eastern NC.
Posts: 4,304
|
|
CORRECTION! Mark in at 1 1/4 inch instead of 1 1/8 in STEP # 3. Sorry!
__________________
Jewlie or Julie, its all the same.
To view links or images in signatures your post count must be 5 or greater. You currently have 0 posts.
To view links or images in signatures your post count must be 5 or greater. You currently have 0 posts.
To view links or images in signatures your post count must be 5 or greater. You currently have 0 posts.
My Facebook
|
2008-10-29, 7:46am
|
|
Senior Member
|
|
Join Date: Jan 11, 2007
Location: Eastern NC.
Posts: 4,304
|
|
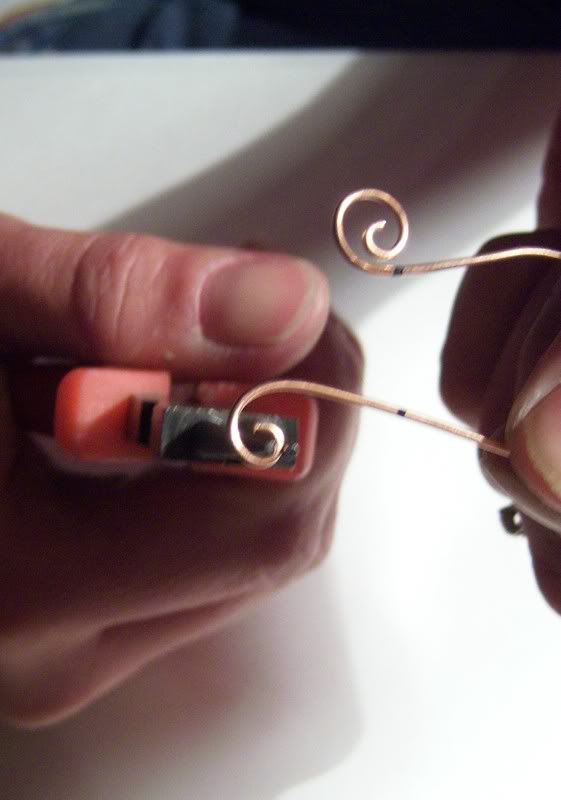
STEP # 4.
Using your round nose pliers, start from end of wire and make your swirl. Repeat this on the other end as well and stop at the mark you just made in step 3. Be sure to make both swirls the same size so they match.
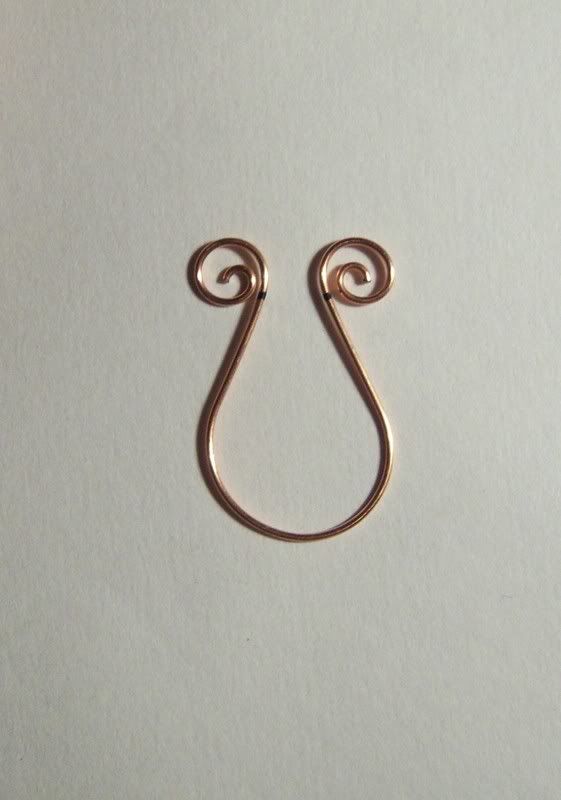
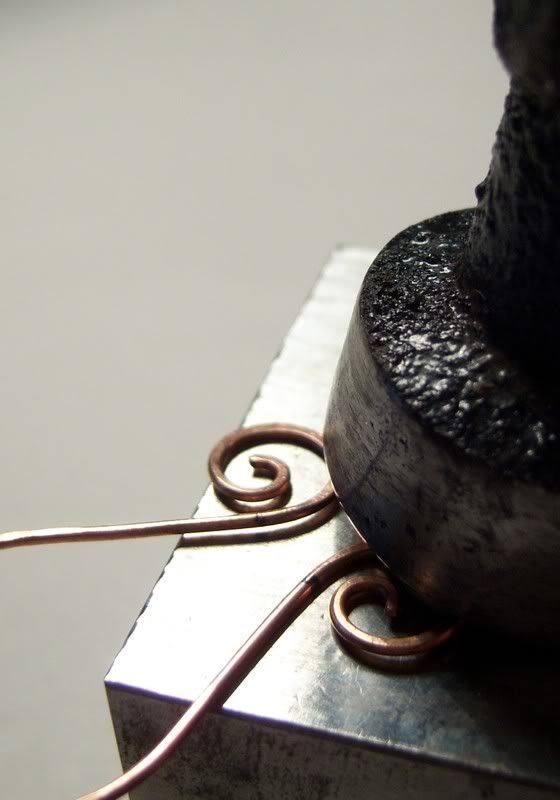
STEP # 5.
With your chasing hammer and steel block or anvil, lightly tap the swirls till they are slightly flattened. Continue tapping all the way around your pendant frame. This will strengthen the wire.
__________________
Jewlie or Julie, its all the same.
To view links or images in signatures your post count must be 5 or greater. You currently have 0 posts.
To view links or images in signatures your post count must be 5 or greater. You currently have 0 posts.
To view links or images in signatures your post count must be 5 or greater. You currently have 0 posts.
My Facebook
|
2008-10-29, 7:57am
|
|
Senior Member
|
|
Join Date: Jan 11, 2007
Location: Eastern NC.
Posts: 4,304
|
|
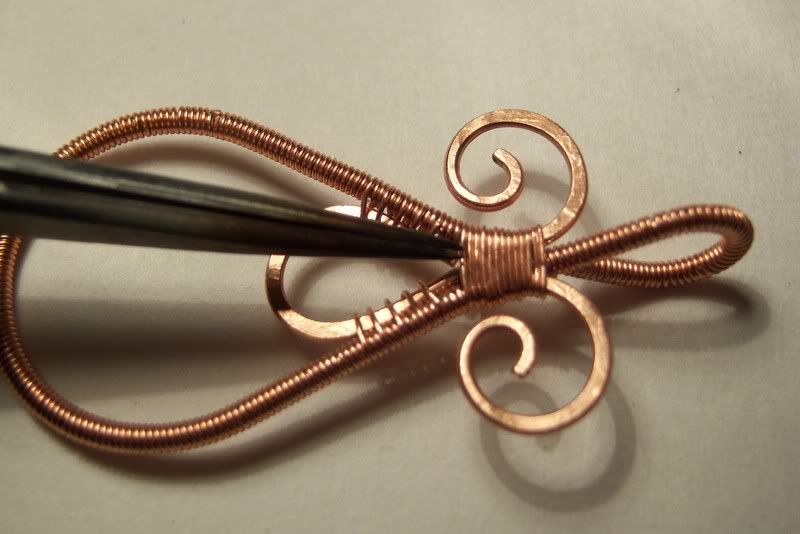
STEP # 6.
Cut 1 piece of 18 gauge wire 2 1/2 inches long. File the ends of wire.
With your ruler and sharpie, mark in from each end 1 1/8 inch.
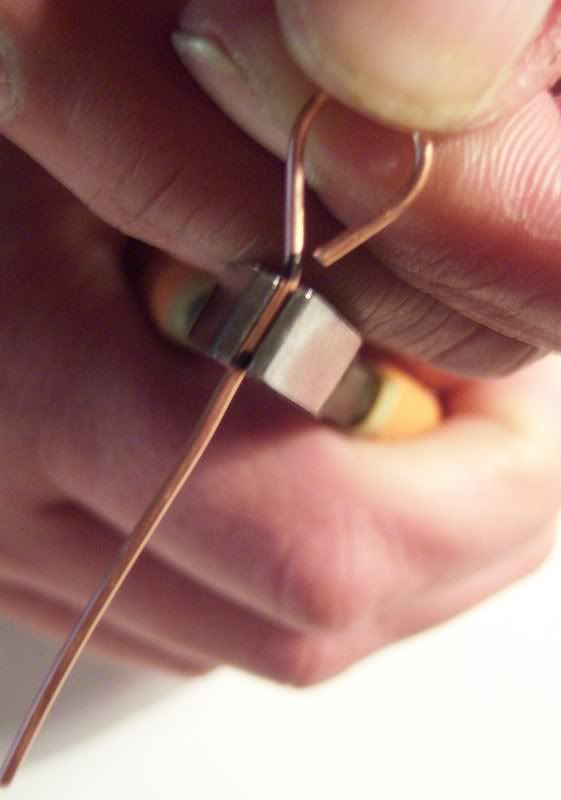
STEP # 7.
Using your 1/4 inch dowel, wrap the ends around until it touches your first mark.

STEP # 8.
Using your flat nose pliers, hold on just below the mark and bend your loop shape up so it looks even.
__________________
Jewlie or Julie, its all the same.
To view links or images in signatures your post count must be 5 or greater. You currently have 0 posts.
To view links or images in signatures your post count must be 5 or greater. You currently have 0 posts.
To view links or images in signatures your post count must be 5 or greater. You currently have 0 posts.
My Facebook
|
2008-10-29, 8:02am
|
|
Senior Member
|
|
Join Date: Jan 11, 2007
Location: Eastern NC.
Posts: 4,304
|
|
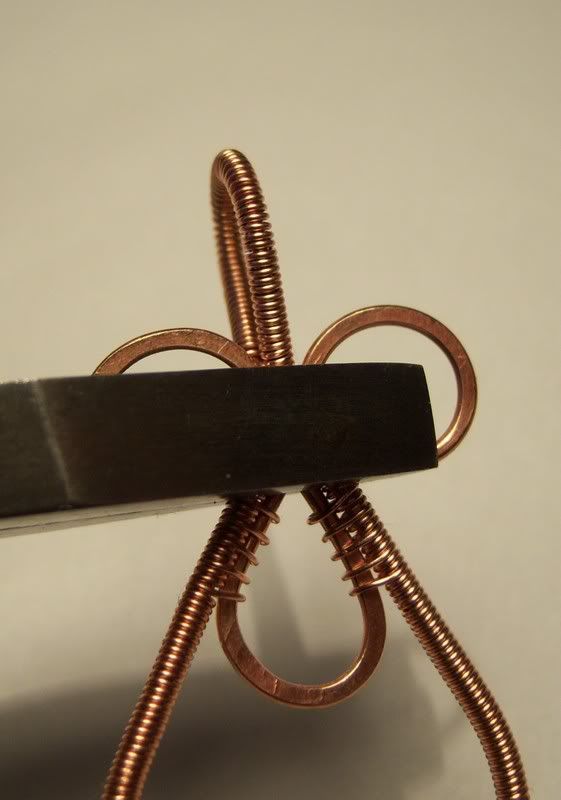
STEP # 9.
Repeat step #8 but this time your loop must be perpendicular to the first loop.
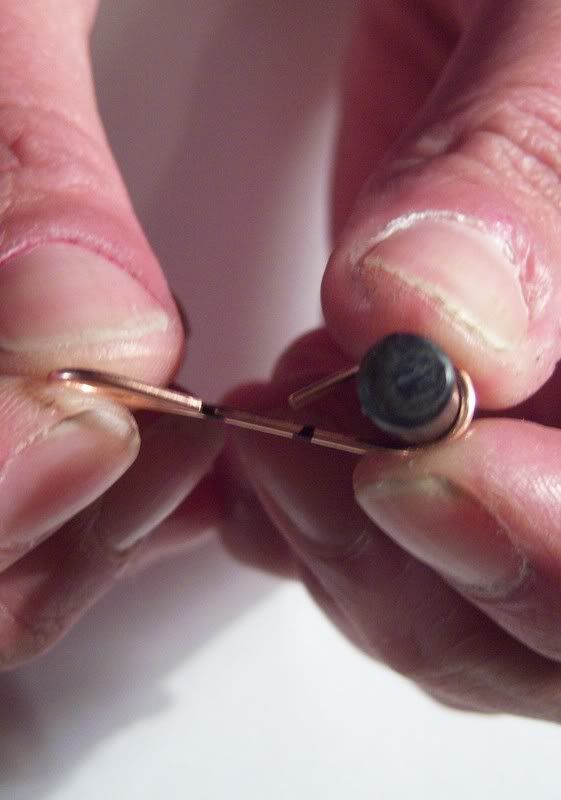

STEP # 10
Lightly tap both ends of loops to strengthen them. This will be your bail and center loop in the pendant.
__________________
Jewlie or Julie, its all the same.
To view links or images in signatures your post count must be 5 or greater. You currently have 0 posts.
To view links or images in signatures your post count must be 5 or greater. You currently have 0 posts.
To view links or images in signatures your post count must be 5 or greater. You currently have 0 posts.
My Facebook
|
2008-10-29, 8:21am
|
|
Senior Member
|
|
Join Date: Jan 11, 2007
Location: Eastern NC.
Posts: 4,304
|
|
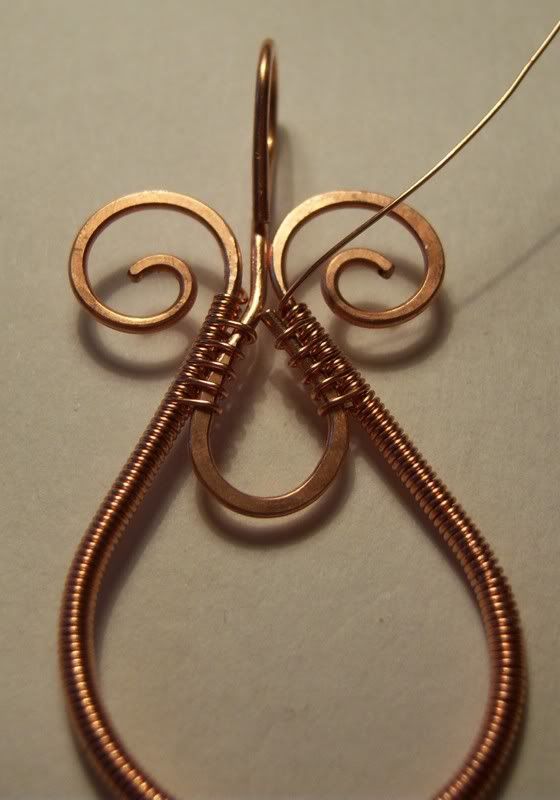
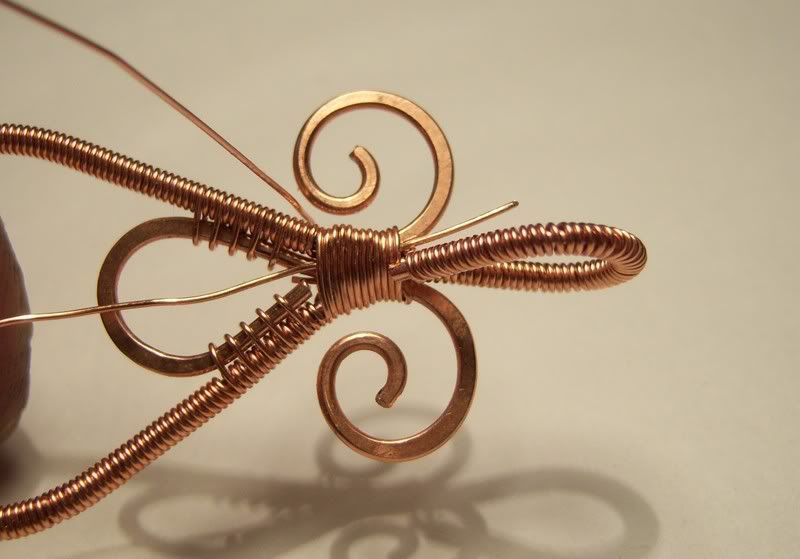
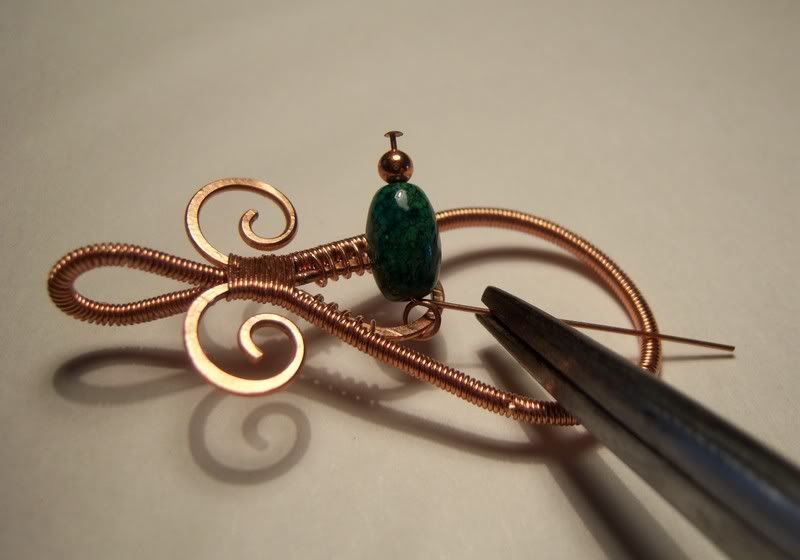
STEP # 11.
Next you will need 73 inches of 26 gauge wire for smaller pendant or 84 inches for larger pendant. You will want to cut the wire in shorter lengths about 15 to 20 inches long. It will be easier to work with. Start at the top of the pendant frame and make 3 wraps. You may need to use your finger nail to push wraps close together.
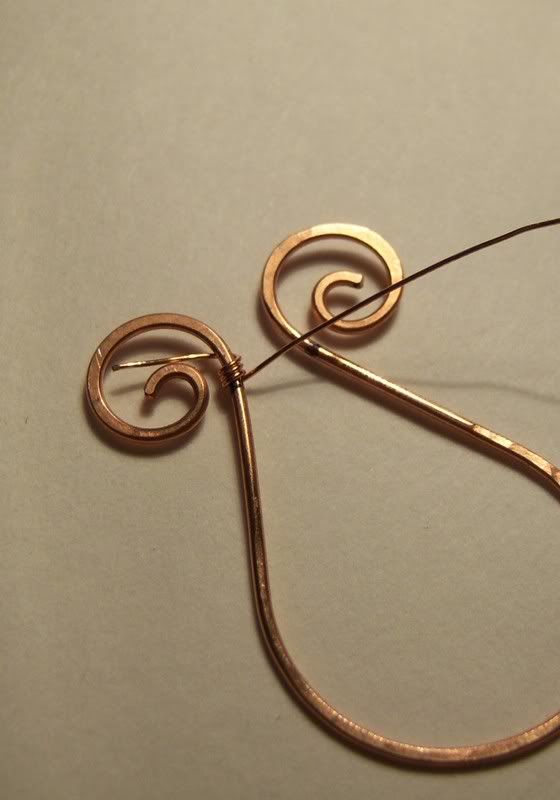
STEP # 12.
This part may be a little ackward so you may want to hold the outside frame and inside loop in place with your chain nose pliers.
Now you will be attaching the loop and bail. Both loops should be the same size so it does'nt matter which loop you use. Center one of the loops in between the pendant frame. You will then wrap all the way around the center loop and outsideframe. Make 2 wraps around outside frame and repeat with another wrap around outside frame and inside loop. Do this until you have 5 wraps around the inside loop and outside frame.

__________________
Jewlie or Julie, its all the same.
To view links or images in signatures your post count must be 5 or greater. You currently have 0 posts.
To view links or images in signatures your post count must be 5 or greater. You currently have 0 posts.
To view links or images in signatures your post count must be 5 or greater. You currently have 0 posts.
My Facebook
|
2008-10-29, 8:28am
|
|
Senior Member
|
|
Join Date: Jan 11, 2007
Location: Eastern NC.
Posts: 4,304
|
|
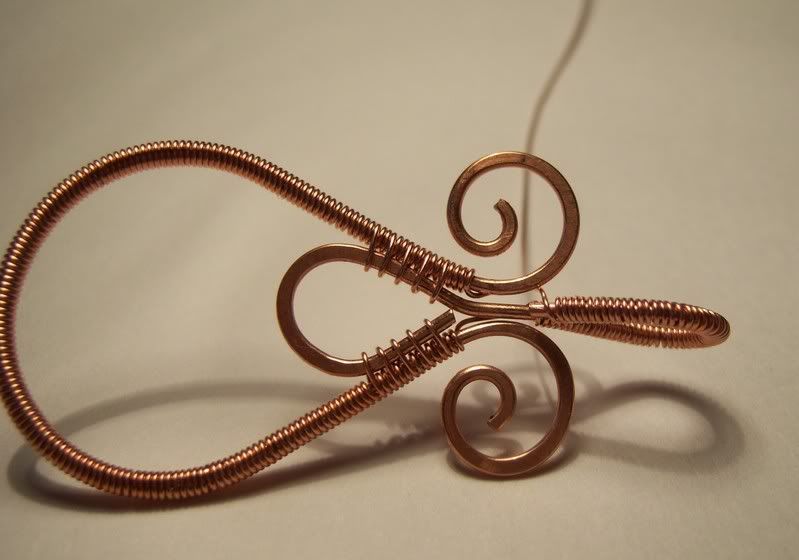
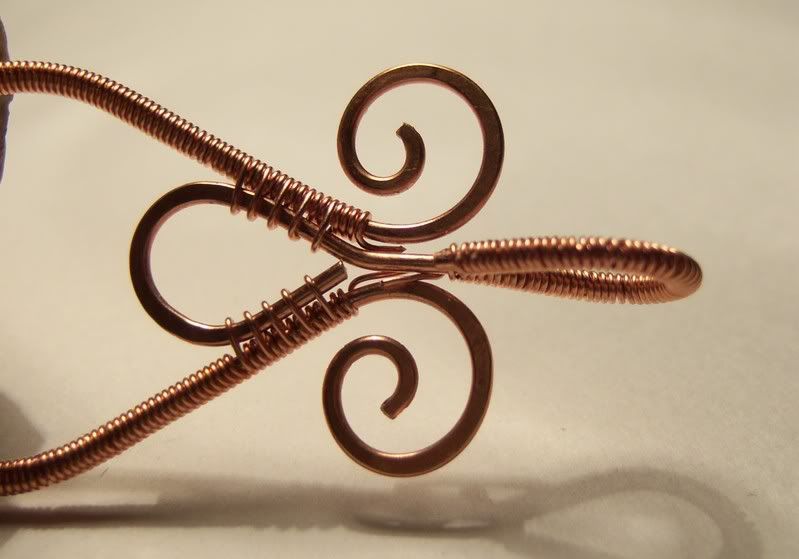
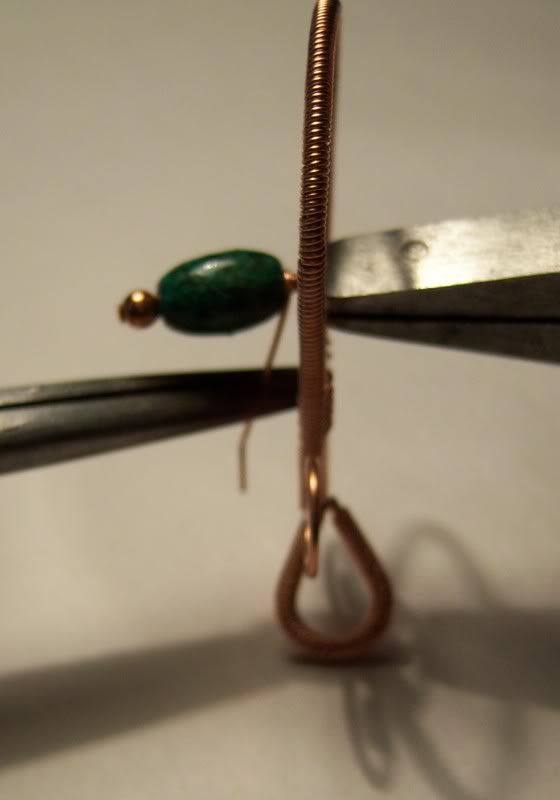
STEP # 13.
Wrap all the way around until you get to the other side and repeat step # 12.
STEP # 14.
Bring your 26 gauge wire up in between the top of the frame and to the bail. This will be hidden later.
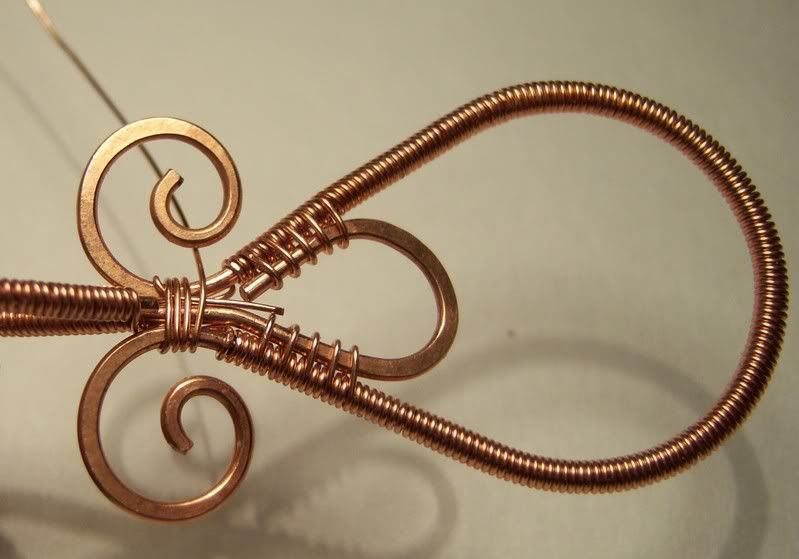
STEP # 15.
Start wrapping your bail. Start with the front and work your way to the back.When complete, cut your wire leaving about 1/4 to 1/8 inch on the end.

__________________
Jewlie or Julie, its all the same.
To view links or images in signatures your post count must be 5 or greater. You currently have 0 posts.
To view links or images in signatures your post count must be 5 or greater. You currently have 0 posts.
To view links or images in signatures your post count must be 5 or greater. You currently have 0 posts.
My Facebook
|
2008-10-29, 8:34am
|
|
Senior Member
|
|
Join Date: Jan 11, 2007
Location: Eastern NC.
Posts: 4,304
|
|
STEP # 16.
Tuck all ends in between the neck of the pendant. These ends will be hidden later.
STEP # 17.
Using your 26 gauge wire, tuck about 1/8 - 1/4 inch in between the neck of the pendant and start wrapping around tightly. Wraparound 3-4 times and if any ends need trimmed down then do so now. Wrap all the way down until all ends are hidden and neck is completely wrapped.
__________________
Jewlie or Julie, its all the same.
To view links or images in signatures your post count must be 5 or greater. You currently have 0 posts.
To view links or images in signatures your post count must be 5 or greater. You currently have 0 posts.
To view links or images in signatures your post count must be 5 or greater. You currently have 0 posts.
My Facebook
|
2008-10-29, 8:39am
|
|
Senior Member
|
|
Join Date: Jan 11, 2007
Location: Eastern NC.
Posts: 4,304
|
|
STEP # 18.
Now its time to finish your ends. Try slipping the end of your wire through the wrap at the neck of the pendant. You may need to use dental pick to open enough room for your wire to fit through. Once you see your end come through the top, pull through tightly using your chain nose or flat nose pliers. Cut the wire off as close as you can to the neck of the pendant.
__________________
Jewlie or Julie, its all the same.
To view links or images in signatures your post count must be 5 or greater. You currently have 0 posts.
To view links or images in signatures your post count must be 5 or greater. You currently have 0 posts.
To view links or images in signatures your post count must be 5 or greater. You currently have 0 posts.
My Facebook
|
2008-10-29, 8:44am
|
|
Senior Member
|
|
Join Date: Jan 11, 2007
Location: Eastern NC.
Posts: 4,304
|
|
STEP # 19.
Using your tweezers, grab the end of the wire you just cut and push it inside the neck so its hidden. This would be a good time to do the same with any other visible ends.
STEP # 20.
Using your flat nose pliers, give the neck a firm squish. This will flatten down the wire that was lifted to pull the end through.
__________________
Jewlie or Julie, its all the same.
To view links or images in signatures your post count must be 5 or greater. You currently have 0 posts.
To view links or images in signatures your post count must be 5 or greater. You currently have 0 posts.
To view links or images in signatures your post count must be 5 or greater. You currently have 0 posts.
My Facebook
|
2008-10-29, 8:48am
|
|
beads....mmmm
|
|
Join Date: Jul 06, 2005
Location: WA
Posts: 1,871
|
|
Wow, great job on the tutorial! Thanks so much!
__________________
To view links or images in signatures your post count must be 5 or greater. You currently have 0 posts.
::
To view links or images in signatures your post count must be 5 or greater. You currently have 0 posts.
::
To view links or images in signatures your post count must be 5 or greater. You currently have 0 posts.
::
To view links or images in signatures your post count must be 5 or greater. You currently have 0 posts.
::
|
2008-10-29, 8:50am
|
 |
Senior Member
|
|
Join Date: Sep 01, 2007
Location: Greenville, SC
Posts: 1,749
|
|
Julie,
You do such beautiful work and it's extremely generous of you to share this tutorial. I've just started playing around with wire, and you are a master artist! I can't believe you hand coiled all that wire! You make it look easy. Can't wait to try this one. Thanks for sharing!
__________________
~Rachel
To view links or images in signatures your post count must be 5 or greater. You currently have 0 posts.
To view links or images in signatures your post count must be 5 or greater. You currently have 0 posts.
|
2008-10-29, 8:52am
|
 |
Senior Member
|
|
Join Date: Jun 10, 2005
Location: Manhattan,KS the land of Purple Pride
Posts: 7,718
|
|
Jewlie,
That is an awesome tut. Thank you.
__________________
To view links or images in signatures your post count must be 5 or greater. You currently have 0 posts.
Rose Leslie
_____________________________________
|
2008-10-29, 8:54am
|
|
Senior Member
|
|
Join Date: Jan 11, 2007
Location: Eastern NC.
Posts: 4,304
|
|
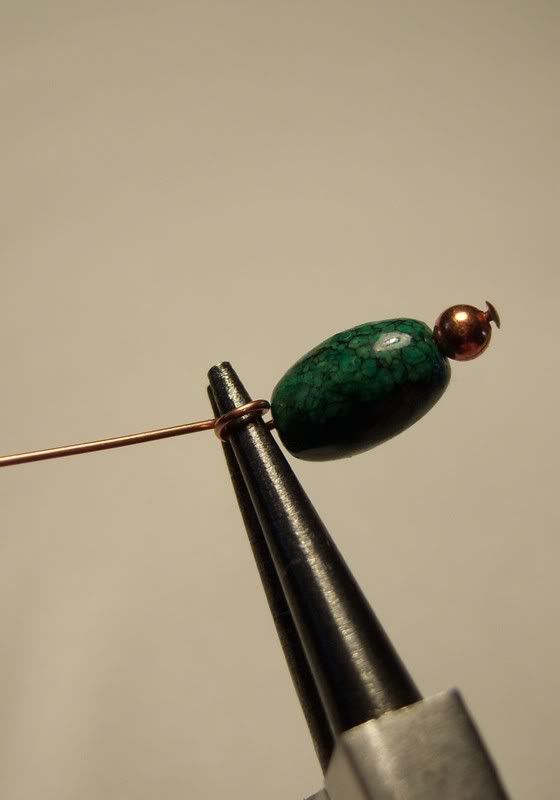
STEP # 21.
Now its time to add your bead. I chose a 13mm x 7mm lampwork bead, bead cap, and 2 smaller beads for my large pendant. My small pendant I used a 9mm x 6mm stone bead and small 3mm round copper bead. Thread your beads of choice onto a 2 inch head pin. Using your round nose pliers, grab the wire about a 1/2 inch above the bead. Bring the wire around to make a full loop. Next, turn your pliers in the opposite direction to center your loop on top.

__________________
Jewlie or Julie, its all the same.
To view links or images in signatures your post count must be 5 or greater. You currently have 0 posts.
To view links or images in signatures your post count must be 5 or greater. You currently have 0 posts.
To view links or images in signatures your post count must be 5 or greater. You currently have 0 posts.
My Facebook
|
2008-10-29, 9:00am
|
 |
Senior Member
|
|
Join Date: Oct 23, 2005
Location: Wisconsin
Posts: 194
|
|
Jewlie,
Cannot wait to try your tutorial. It looks great. Thanks so much for being so generous with your time, & knowledge.
Colleen
|
2008-10-29, 9:01am
|
 |
I think I could be a bead
|
|
Join Date: Jun 28, 2006
Posts: 10,992
|
|
Wow! Thank you so much for this tutorial! I would have paid money for it, it's so good! This is very kind and generous of you!
__________________
Mallory
To view links or images in signatures your post count must be 5 or greater. You currently have 0 posts.
To view links or images in signatures your post count must be 5 or greater. You currently have 0 posts.
To view links or images in signatures your post count must be 5 or greater. You currently have 0 posts.
|
2008-10-29, 9:02am
|
|
Senior Member
|
|
Join Date: Jan 11, 2007
Location: Eastern NC.
Posts: 4,304
|
|
STEP # 22.
Open you loop just enough to slip it through the center loop of your pendant. Once its on the loop, close the opening you just made on your head pin.
STEP # 23.
Using your flat nose pliers, grab the top of the loop on your head pin. Use your needle nose pliers to grab the end of the head pin and start wrapping around until you meet the top of the bead. Clip any extra wire off the end and use your needle nose pliers to squish the end down.
Your pendant is now finished. You may choose to antique your pendant with liver of sulfur or leave it as is and polish.
__________________
Jewlie or Julie, its all the same.
To view links or images in signatures your post count must be 5 or greater. You currently have 0 posts.
To view links or images in signatures your post count must be 5 or greater. You currently have 0 posts.
To view links or images in signatures your post count must be 5 or greater. You currently have 0 posts.
My Facebook
|
2008-10-29, 9:03am
|
|
Senior Member
|
|
Join Date: Jan 11, 2007
Location: Eastern NC.
Posts: 4,304
|
|
WHEW! I'm done! LOL!
__________________
Jewlie or Julie, its all the same.
To view links or images in signatures your post count must be 5 or greater. You currently have 0 posts.
To view links or images in signatures your post count must be 5 or greater. You currently have 0 posts.
To view links or images in signatures your post count must be 5 or greater. You currently have 0 posts.
My Facebook
|
2008-10-29, 9:04am
|
|
Senior Member
|
|
Join Date: Sep 01, 2007
Location: Greenville, SC
Posts: 1,749
|
|
Ok. That's just too funny. We all got so excited and didn't even realize you weren't finished with the tut!
__________________
~Rachel
To view links or images in signatures your post count must be 5 or greater. You currently have 0 posts.
To view links or images in signatures your post count must be 5 or greater. You currently have 0 posts.
|
2008-10-29, 9:09am
|
|
Senior Member
|
|
Join Date: Jan 11, 2007
Location: Eastern NC.
Posts: 4,304
|
|
Hehehe! I was laughing and trying to type at the same time. Thank you all so much. LOL! Let me know what you think. I would like to do another one sometime soon. I will leave my grubby wire fingers out of the next tutorial. LOL!
__________________
Jewlie or Julie, its all the same.
To view links or images in signatures your post count must be 5 or greater. You currently have 0 posts.
To view links or images in signatures your post count must be 5 or greater. You currently have 0 posts.
To view links or images in signatures your post count must be 5 or greater. You currently have 0 posts.
My Facebook
|
2008-10-29, 9:09am
|
|
Senior Member
|
|
Join Date: Sep 04, 2005
Location: Redding, CA
Posts: 207
|
|
WOW, just WOW. Thanks for taking the time to share this technique, I can't wait to try it.
Sharon
|
2008-10-29, 9:13am
|
 |
........
|
|
Join Date: Jun 29, 2005
Location: Southern California
Posts: 1,117
|
|
I love it. When I saw your message I was so excited and ready to buy it w/o reading it. What a generous person you are Jewlie.
__________________
Julia
|
2008-10-29, 9:16am
|
|
Senior Member
|
|
Join Date: Jan 11, 2007
Location: Eastern NC.
Posts: 4,304
|
|
Thank you! You all are generous! This is for all the help everyone has given me in the past. I hope you all like it.
__________________
Jewlie or Julie, its all the same.
To view links or images in signatures your post count must be 5 or greater. You currently have 0 posts.
To view links or images in signatures your post count must be 5 or greater. You currently have 0 posts.
To view links or images in signatures your post count must be 5 or greater. You currently have 0 posts.
My Facebook
|
2008-10-29, 9:18am
|
 |
Anyone need some spacers?
|
|
Join Date: Oct 08, 2005
Location: Pennfield, MI
Posts: 3,060
|
|
This is wonderful, thanks for sharing.
__________________
Tracy
To view links or images in signatures your post count must be 5 or greater. You currently have 0 posts.
To view links or images in signatures your post count must be 5 or greater. You currently have 0 posts.
To view links or images in signatures your post count must be 5 or greater. You currently have 0 posts.
|
2008-10-29, 9:34am
|
 |
Senior Member
|
|
Join Date: Aug 09, 2005
Location: Portsmouth, VA
Posts: 1,337
|
|
Wow Julie!! Thank you so much  . I can't wait to try this...now to remember where my wire is stashed 
__________________
Sherry
To view links or images in signatures your post count must be 5 or greater. You currently have 0 posts.
To view links or images in signatures your post count must be 5 or greater. You currently have 0 posts.
|
2008-10-29, 9:46am
|
 |
Crazy Snake Lady
|
|
Join Date: Jul 31, 2006
Posts: 5,583
|
|
Fantastic!!! Thank you so much for sharing this!
__________________
Mrs. C
|
2008-10-29, 9:49am
|
 |
da General
|
|
Join Date: Oct 05, 2006
Location: San Francisco
Posts: 13,002
|
|
Awesome tutorial, Julie! Great pix too. Thank YOU!!!
__________________
Hayley
To view links or images in signatures your post count must be 5 or greater. You currently have 0 posts.
To view links or images in signatures your post count must be 5 or greater. You currently have 0 posts.
|
To view links or images in signatures your post count must be 5 or greater. You currently have 0 posts.
|
To view links or images in signatures your post count must be 5 or greater. You currently have 0 posts.
|
To view links or images in signatures your post count must be 5 or greater. You currently have 0 posts.
|
To view links or images in signatures your post count must be 5 or greater. You currently have 0 posts.
|
2008-10-29, 9:56am
|
|
Senior Member
|
|
Join Date: Sep 14, 2005
Posts: 9,727
|
|
Julie, what a fabulous tutorial!!!! 
J.
__________________
"Hatred is never ended by hatred but by love, and a misunderstanding is never ended by argument but by tact, diplomacy, conciliation, and a sympathetic desire to see the other person's viewpoint." ~The Buddha | We are all humans and none of us is more human than the other. Romeo Dallaire "Never look down on anybody unless you're helping him up." ~ Rev.Jesse Jackson]
|
2008-10-29, 9:58am
|
|
Senior Member
|
|
Join Date: Jan 11, 2007
Location: Eastern NC.
Posts: 4,304
|
|
Thank you!
__________________
Jewlie or Julie, its all the same.
To view links or images in signatures your post count must be 5 or greater. You currently have 0 posts.
To view links or images in signatures your post count must be 5 or greater. You currently have 0 posts.
To view links or images in signatures your post count must be 5 or greater. You currently have 0 posts.
My Facebook
|
|
Currently Active Users Viewing This Thread: 1 (0 members and 1 guests)
|
|
|
 Posting Rules
|
You may not post new threads
You may not post replies
You may not post attachments
You may not edit your posts
HTML code is Off
|
|
|
All times are GMT -7. The time now is 4:52am.
|


