

|

2009-09-20, 1:10pm
|
|
Mitch
|
|
Join Date: Sep 20, 2009
Location: Largo, Florida
Posts: 3
|
|
 Looking for a Tutorial for Chili Pepers
Hello All,
Sorry, but I went through the first 20 pages and I did not find a tutorial on how to make lampworked chili peppers. The ones I saw were from a calendar and were on a hand woven bracelet. There were about 20 of them, with stunning colors.
Can anyone help me out?
|
2009-09-21, 6:39am
|
 |
Senior Member
|
|
Join Date: Aug 26, 2007
Posts: 220
|
|
Oh, I'd like to know too!
__________________
To view links or images in signatures your post count must be 5 or greater. You currently have 0 posts.
To view links or images in signatures your post count must be 5 or greater. You currently have 0 posts.
|
2009-09-21, 7:47pm
|
|
Senior Member
|
|
Join Date: Feb 20, 2007
Posts: 768
|
|
Surface Chili Peppers
I'm not sure if this is the kind of chili peppers you're looking for but this is how I made surface chili peppers.
1. Make your base bead.
2. Using an encased fat stringer swipe a comma shape for the pepper.
3. Heat and using a razor tool make creases on the pepper.
4. put a dot on the top and kind of pull it with your stringer to cover the top of the pepper.
5. Using a thin stringer, add a little comma shape for the stem.
I'm sorry I can't do step by step photo's. The last time I tried to take pictures while at the torch I melted my lens cap.
Hope this help.
|
2009-09-21, 7:52pm
|
 |
Dangerous Woman
|
|
Join Date: Nov 21, 2005
Location: Southcentral PA
Posts: 5,018
|
|
If Mitch is thinking of the same ones I am I think they may be off mandrel. The top green part has a loop and the pepper is attached to that. They seem like they would be easy to make but i've never been able to do it.
__________________
Nancy
May your torch burn brightly and your oxy never run out. - Karen Hardy
On a Cheetah with a hurricane Still have my Lynx as a back up.
|
2009-09-22, 6:24am
|
 |
On a good hair day.
|
|
Join Date: Dec 23, 2005
Location: Fort Worth, TX
Posts: 1,380
|
|
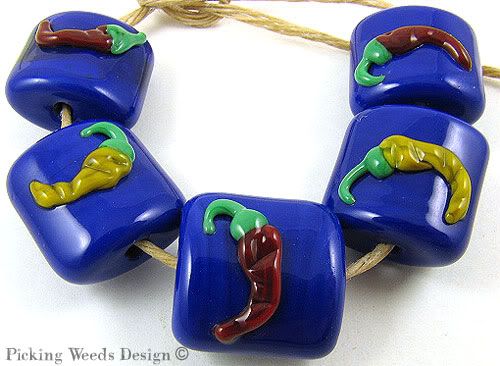
Something like these? They are not off mandrel though. Sorry for the big pic.
Patricia
__________________
To view links or images in signatures your post count must be 5 or greater. You currently have 0 posts.
To view links or images in signatures your post count must be 5 or greater. You currently have 0 posts.
|
2009-09-22, 2:59pm
|
|
Mitch
|
|
Join Date: Sep 20, 2009
Location: Largo, Florida
Posts: 3
|
|
Thank you for the replies.
The larger peppers were the ones that I was interested in, but they were off the manderel. They were also very nicely colored like the the glass beads and they some had very nice patterns.
I do not know if they were jollow or solid. They appeared to be only 2 to 2 1/2 inches in size.
|
2009-09-26, 2:21pm
|
|
Dangerous Woman
|
|
Join Date: Nov 21, 2005
Location: Southcentral PA
Posts: 5,018
|
|
Quote:
Originally Posted by CalamitysClan

Something like these? They are not off mandrel though. Sorry for the big pic.
Patricia
|
I tried to make peppers like these only off mandrel - making a loop with the green part but just couldn't quite get the colored shape right. Maybe I didn't try hard enough. I'll have to give it another go.
__________________
Nancy
May your torch burn brightly and your oxy never run out. - Karen Hardy
On a Cheetah with a hurricane Still have my Lynx as a back up.
|
2009-09-29, 4:05pm
|
 |
Uh Oh....
|
|
Join Date: Dec 06, 2005
Posts: 1,039
|
|
I made some off mandrel chili peppers. Do they look like this:

If so, pm and I'll write up the instructions.
Susan
Quote:
Originally Posted by Skyeluna62
Thank you for the replies.
The larger peppers were the ones that I was interested in, but they were off the manderel. They were also very nicely colored like the the glass beads and they some had very nice patterns.
I do not know if they were jollow or solid. They appeared to be only 2 to 2 1/2 inches in size.
|
|
2009-09-29, 4:10pm
|
|
Uh Oh....
|
|
Join Date: Dec 06, 2005
Posts: 1,039
|
|
Here's another picture or one pepper.

Susan
|
2009-09-29, 5:06pm
|
|
Mitch
|
|
Join Date: Sep 20, 2009
Location: Largo, Florida
Posts: 3
|
|
Hi Susan,
Yep, they looked prtty much like those, but they were more colorful... not realistic, purples, orange, lots and lots of colors, with stripes, dots and other patterns.
But yes, I would welcome any help I can get.
|
2009-09-29, 5:17pm
|
|
Dangerous Woman
|
|
Join Date: Nov 21, 2005
Location: Southcentral PA
Posts: 5,018
|
|
I'd love some advice on how to do them too Susan. They look pretty good!
__________________
Nancy
May your torch burn brightly and your oxy never run out. - Karen Hardy
On a Cheetah with a hurricane Still have my Lynx as a back up.
|
2009-09-29, 5:52pm
|
|
Uh Oh....
|
|
Join Date: Dec 06, 2005
Posts: 1,039
|
|
Okay do you mean like the kind that Stephanie Sersich makes? I don't want to post a picture here but you can see her beads on her website. http://www.sssbeads.com
They aren't really chili peppers and I'm not sure what Stephanie calls her beads.
Susan
Quote:
Originally Posted by Skyeluna62
Hi Susan,
Yep, they looked prtty much like those, but they were more colorful... not realistic, purples, orange, lots and lots of colors, with stripes, dots and other patterns.
But yes, I would welcome any help I can get.
|
|
2009-09-29, 6:36pm
|
|
Uh Oh....
|
|
Join Date: Dec 06, 2005
Posts: 1,039
|
|
It's pretty fun just playing with different colors. They aren't hard to make and it's a good way to practice the loops.
This is the way I make my chili peppers. I'm sure there are other ways to make them too.
1. I used mosiac green for my leaves and looped stem. Any dark green color will work. Encased, more intricate stringer can be used for the leaves if you like. I just use a plain mosiac green stringer. So, the first step is to pull a green stringer. I make mine about 2 mm thick.
2. I use two rods of the same color that I want my chili pepper to be and I melt a big ball of glass on one of the rods. I heat it up really well and with the other rod, I heat the tip of it and touch it to the hot ball of glass and slowly pull it into a chili shape. The attached rod should be attached well enough so it is firmly attached to the glass. It also should be the more pointy side of the chili shape. Now you have two rods attached one at each end. Burn the rod off on the thicker, or the first rod that's used to make the big ball of glass with. Smooth out the top and add little squishes and marks into the chili shape to make it more realistic.
3. Applying the leaves - This is harder to explain but I'll try. I heat up my stringer into about a ball bearing sized ball. On the top of the chili, I press the glass and kind of draw a short line, then pull up on the stringer and flame cut it. I go around the top adding several leaves this way. After I go all the way around the top, if there's a space on the top middle of the chili, I add a dot of green to fill in that space so the entire top is green. Then, I go back and heat the leaf ends and using my stringer, pull the excess glass off to make them pointed. Make sure the leaves are well attached to the glass so they don't pop off.
4. Now for the loop, I head a ball of glass from the same green that I used for the leaves. I touch the ball of glass to the top of the chili but not in the middle, more like off center. I slowly pull the glass up and around so it forms a U. The object is to touch the other side down to the top of the chili and burn the rod off without having the hole close up all in one swoop. It's kind of hard to do that on the smaller peppers as the top isn't that big. So, I go for the U shape and then burn my rod off. Then I go back and rehead the end of the U, grab it with my tweezers and smash it onto the top of the chili. Make sure both sides of the loop are well melted in. I'll use my tungsten pick while working on the loop to reshape it and to keep the hole from closing up.
4a. If the hole closes up or there's no saving it, not to worry. Now there should be a ball of green on the top of the chili. Heat the ball up and mash it a bit so it's more like a little paddle shape. Reheat it and using scissors, cut into the middle of the paddle. Using tweezers, push the two cut pieces out a bit so there's some space in the middle. Then heat one of the cut ends and curve it over to meet the other end with tweezers. Go back and smooth out the hole with a tungsten pick. Depending on how big a chili it is, I sometimes have to curve both of the cut pieces toward each other before I stick them together.
5. After I have a good looking loop, I take my big tweezers and kind of wave them in my flame to heat them up a bit, just so I can grab the looped end without it thermal shocking. Then I flame cut the rod off at the other end. I'll go back and refine that end a bit by shaping it with the rod end.
6. That's it. Just pop the chili into the kiln!!
The great thing about chili peppers is they don't have to be perfect. Any marks or crookedness adds a more realistic look to them.
Hope this helps!!
Susan
Quote:
Originally Posted by playswithfire104
I'd love some advice on how to do them too Susan. They look pretty good!
|

|
|
Currently Active Users Viewing This Thread: 1 (0 members and 1 guests)
|
|
|
 Posting Rules
|
You may not post new threads
You may not post replies
You may not post attachments
You may not edit your posts
HTML code is Off
|
|
|
All times are GMT -7. The time now is 12:07am.
|


