

|

2013-05-17, 8:02am
|
|
Senior Member
|
|
Join Date: Mar 07, 2011
Location: Northern California
Posts: 2,023
|
|
Quote:
Originally Posted by Liquidsand

Istandalone, how do you get your big, thin maria? Any particular method/tricks? For me, the bigger it gets, the thicker it is. I've tried mashing it all around the edge, but that just ends in a hot mess.
|
Sounds like your not getting it hot enough. Also, the evenness of the starting shape is critical to getting a good on center thin disk. When I start off my implosions I start with a 1.5" solid sphere that already has had a trip to the mold.
|
2013-05-17, 10:07am
|
 |
Senior Member
|
|
Join Date: Oct 06, 2008
Location: SE PA
Posts: 1,996
|
|
Thanks Mary. I've been trying to lighten my colors up. The "mature" ladies seem to like those best. This was my first outting with Paramore. The Peach is lovely. I tried the pink last week and it thinned completely out in the compression :frown:
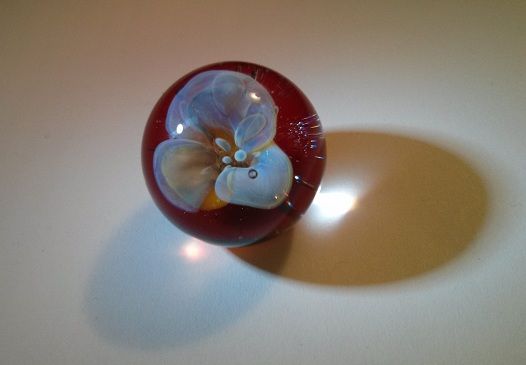
Here is the reef red pendant and a couple new designs I'm still working on fine tuning. A sunflower on the left and a hibiscus flower on the right.


__________________
Laura
To view links or images in signatures your post count must be 5 or greater. You currently have 0 posts.
|
2013-05-17, 6:40pm
|
 |
Flamewoman
|
|
Join Date: Jan 12, 2007
Location: California
Posts: 985
|
|
Wow, like those Laura, especially that reef red one, nice. Is that the color?
Reef red? It doesn't look like it tried to boil on you, I have fits with red.
__________________
Mary K
GTT Sidewinder & 3 Regalias
To view links or images in signatures your post count must be 5 or greater. You currently have 0 posts.
You cannot do a kindness too soon, for you never
know how soon it will be too late.
To view links or images in signatures your post count must be 5 or greater. You currently have 0 posts.
PLEASE like my page!
|
2013-05-17, 7:57pm
|
 |
Member
|
|
Join Date: May 10, 2013
Location: seattle
Posts: 80
|
|
Thanks for explaining the tube implosion. Still trying to understand what's going on there. I haven't done anything with tubing yet so it's hard for me to picture.
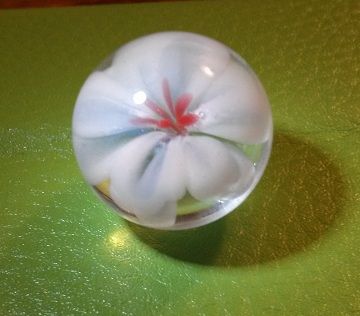
Couple more, not sure I'm getting better at making the lines but I am adding some different color so maybe they are a little more interesting.
|
2013-05-17, 8:38pm
|
|
Senior Member
|
|
Join Date: Oct 06, 2008
Location: SE PA
Posts: 1,996
|
|
Yup ... the first one is a TAG color called Reef Red ... I luvs it. It does seem to get darker (liver) if you work it too long.
Hey Will. That was my version of a really quick explanation. If you are interested in a tutorial...I highly recommend Ron Bearer Jrs. implosion tute. The last addendum he cover tube implosions.
I should also add the link that was they "a-ha" moment for me with compression style implosions. I have/had both of Chad Trent's pendant books but this free tute and how it was explained just set me on the correct path. (off to find the link)
Okay ... as luck would have it ... the link is in LE's free tutorials area ... but Anakin's Eye website is no longer up and running. Sooo...being the packrat that I am ... I found a back up disk that still had the pdf on it. However ... it is too big to upload here. Anyone that wants it ... pm me with your email address and I will forward it.
__________________
Laura
To view links or images in signatures your post count must be 5 or greater. You currently have 0 posts.
|
2013-05-17, 8:59pm
|
|
Flamewoman
|
|
Join Date: Jan 12, 2007
Location: California
Posts: 985
|
|
Actually, there is so much to watch and learn from just on Utube. I have learned a lot by just googling what I was interested in, like fuming etc on Utube. And I'ts free.
Sometimes I get watching one after another and watch marble making for an hour.
__________________
Mary K
GTT Sidewinder & 3 Regalias
To view links or images in signatures your post count must be 5 or greater. You currently have 0 posts.
You cannot do a kindness too soon, for you never
know how soon it will be too late.
To view links or images in signatures your post count must be 5 or greater. You currently have 0 posts.
PLEASE like my page!
|
2013-05-17, 9:05pm
|
|
Senior Member
|
|
Join Date: Oct 06, 2008
Location: SE PA
Posts: 1,996
|
|
Quote:
Originally Posted by Mary K
Actually, there is so much to watch and learn from just on Utube. I have learned a lot by just googling what I was interested in, like fuming etc on Utube. And I'ts free.
Sometimes I get watching one after another and watch marble making for an hour.
|
I watched Brent Graber's video of a flower compression repeatedly. It's cool how each person has their own style and even though we are doing the same steps ... each piece of art has it's own character.
__________________
Laura
To view links or images in signatures your post count must be 5 or greater. You currently have 0 posts.
|
2013-05-17, 9:06pm
|
|
Senior Member
|
|
Join Date: Oct 06, 2008
Location: SE PA
Posts: 1,996
|
|
Quote:
Originally Posted by Will.T
|
I really like this one ... the red backing is a unique and very effective choice for highlighting the flower!!
__________________
Laura
To view links or images in signatures your post count must be 5 or greater. You currently have 0 posts.
|
2013-05-17, 9:59pm
|
|
Member
|
|
Join Date: May 10, 2013
Location: seattle
Posts: 80
|
|
I did a search for Brent Graber and found a tube implosion video in his free section. I understand now and wow that's crazy! Amazing to see a piece of tubing melt down like that. Don't think I'll be trying that anytime soon.
|
2013-05-18, 6:23am
|
|
Senior Member
|
|
Join Date: Oct 06, 2008
Location: SE PA
Posts: 1,996
|
|
Quote:
Originally Posted by Will.T
I did a search for Brent Graber and found a tube implosion video in his free section. I understand now and wow that's crazy! Amazing to see a piece of tubing melt down like that. Don't think I'll be trying that anytime soon.
|
Brent ... aka Mr. Smiley ... used to hang out here alot but he moved out to the Oregon coast and doesn't hang as much. Check him out on Facebook though ... he spends a good amount of time there posting what he is working on. His work is phenomenal and his son, Ian, has his own studio and line of glass that is really cool too!!
__________________
Laura
To view links or images in signatures your post count must be 5 or greater. You currently have 0 posts.
|
2013-05-18, 2:02pm
|
 |
Member
|
|
Join Date: Nov 10, 2012
Posts: 64
|
|
Quote:
Originally Posted by LarryC
Sounds like your not getting it hot enough. Also, the evenness of the starting shape is critical to getting a good on center thin disk. When I start off my implosions I start with a 1.5" solid sphere that already has had a trip to the mold.
|
So you gather and round all the glass that is going to be in the maria and flatten it at once? I'll have to try that approach again. I've gotten into the habit of softening the glass at the end of the rod, then flattening it so the edges squish out, reheat, and repeat until the maria is big enough and then reheat the whole thing to get rid of any marks before applying color. It seems just as likely to get off center when bringing a large molten gather to the marver and pushing down on it, and I wonder how you avoid having the glass ballooning out from the middle very thick? I guess that's where the paddling around the edge step comes in.
|
2013-05-18, 2:20pm
|
|
Senior Member
|
|
Join Date: Mar 07, 2011
Location: Northern California
Posts: 2,023
|
|

Quote:
Originally Posted by Liquidsand
So you gather and round all the glass that is going to be in the maria and flatten it at once? I'll have to try that approach again. I've gotten into the habit of softening the glass at the end of the rod, then flattening it so the edges squish out, reheat, and repeat until the maria is big enough and then reheat the whole thing to get rid of any marks before applying color. It seems just as likely to get off center when bringing a large molten gather to the marver and pushing down on it, and I wonder how you avoid having the glass ballooning out from the middle very thick? I guess that's where the paddling around the edge step comes in.
|
No paddling and after the initial marble is formed it is all done in one move on a graphite plate. Gravity is all thats needed to keep this perfectly centered. This setup of a perfectly centered and evenly heated disk is critical to an on center implosion and if you paddle unevenly or make multiple moves to flatten the disk you will mess up the heat base. I mastered this first before moving on to actual implosions. This works for me everytime but use whatever method makes sense to you.
|
2013-05-18, 4:06pm
|
 |
He can do the origami
|
|
Join Date: Nov 24, 2005
Location: Najin Oyate
Posts: 1,474
|
|
Liquidsand,
As LarryC says, whatever method makes sense to you, use it. I do marver a few times during my implosion/compression but each time is brief so as not to lose my heat base.
One thing that works for me that I teach is:
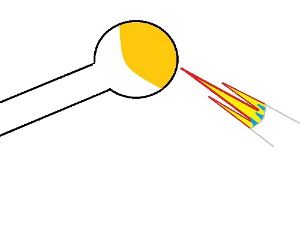
After you have gotten your gather rounded out, concentrate some heat near the end of your gather. I allow the area toward the rod to cool slightly (cool is a very relative term) just cool enough to stiffen a bit, it helps spread the maria evenly and a bit thinner. I add heat toward the tip of the gather. That way the glass at the end is softer and will spread evenly and spread out thinner. After i add sufficient heat I press it against the marver pad and this gives me a wider, thinner maria.
It is one method I use to help overcome an issue I was having that my marias were not thin enough. It may or may not prove useful to you. Give it a try, experiment with heat control and see. Here is a little illustration that may help clarify what I mean. I add heat to the top 1/5 or so of the gather.
|
2013-05-18, 8:12pm
|
|
Flamewoman
|
|
Join Date: Jan 12, 2007
Location: California
Posts: 985
|
|
Thank you Otter for your post, & I want to say that your way is the way I was taught, and the way that I work as well. Your illustration puts my cave woman drawings to shame tho. I never use a marble mold when making a maria. But of course what ever works for each individual in his or her way of doing things. I also never use a paddle on the maria to flatten it, I have experimented with trying that a few times and it always got me an off center design. With the heat base in the correct part of the spere, as shown quite accurately in your illustration, the maria will flatten and be thin. I cool my gather by counting the rotations as I spin it, a habbit I was not even aware of, untill I realized I was doing it one day. Then I heat the inner surface the same way, counting usually to 20 or so. I work with the same size rod, and my pendants are all about the same in size.
__________________
Mary K
GTT Sidewinder & 3 Regalias
To view links or images in signatures your post count must be 5 or greater. You currently have 0 posts.
You cannot do a kindness too soon, for you never
know how soon it will be too late.
To view links or images in signatures your post count must be 5 or greater. You currently have 0 posts.
PLEASE like my page!
|
2013-05-19, 3:00pm
|
|
Member
|
|
Join Date: Nov 10, 2012
Posts: 64
|
|
Wow thanks guys for that little info-burst!
Paddling the edges was recommended elsewhere to make the maria thinner, but it never works for me. I will definitely try the gather-to-maria process you all have described here. However the maria is actually not the main obstacle I've been having with the florals, as discussed already. The particular problem I am having is with lines of color balling up during melt-in and the petals looking globby, like dots. But some good suggestions have been made for that, like getting the maria surface hotter before applying stringer and using a stiffer glass for the first layer of color for petals. I think also it's about stringer control, including the initial size of the stringer. It makes sense that the smaller it is, the more delicate your designs are going to look.
It also makes sense to me that those who have mastered soft glass techniques in their career will have better stringer control because of the subtlety inherent in managing the heat base of soft glass. I've sort of trained myself away from that type of detail work with boro; more recently doing hollow, functional, and making murrini.
I'm supposed to be making beads for my local shop, but I keep procrastinating because I've gotten to the point where I can't stand the post-process; cleaning the beads. I seem to remember the soft glass beads were even more difficult to clean.

|
2013-05-19, 4:08pm
|
|
Flamewoman
|
|
Join Date: Jan 12, 2007
Location: California
Posts: 985
|
|
I know Liquidsand, beads......hate making them anymore. Only if they made mandrels that you could heat the snot out of, and they wouldn't melt. And self cleaning. A long long time ago I think I remember reading about someone who soaked her beads for like a week in coca cola to remove the bead release without any work, but yuck.
__________________
Mary K
GTT Sidewinder & 3 Regalias
To view links or images in signatures your post count must be 5 or greater. You currently have 0 posts.
You cannot do a kindness too soon, for you never
know how soon it will be too late.
To view links or images in signatures your post count must be 5 or greater. You currently have 0 posts.
PLEASE like my page!
|
2013-05-19, 4:11pm
|
|
Senior Member
|
|
Join Date: Mar 07, 2011
Location: Northern California
Posts: 2,023
|
|
My method is essentially the same as John's but I use the marble mold to center the gather up perfectly before flattening.
Quote:
Originally Posted by Liquidsand
It also makes sense to me that those who have mastered soft glass techniques in their career will have better stringer control because of the subtlety inherent in managing the heat base of soft glass.
|
Interesting point of view. Did Kobuki get so good at this by accident? He only works in boro.
|
2013-05-22, 10:06pm
|
|
Member
|
|
Join Date: May 10, 2013
Location: seattle
Posts: 80
|
|
Here's a couple more. Colors didn't turn out exactly like I hoped but still like these.
|
2013-05-24, 10:12am
|
 |
Senior Member
|
|
Join Date: Aug 05, 2008
Location: Louisville Ky.
Posts: 399
|
|
One from me.
Dave
|
2013-05-24, 2:03pm
|
 |
Hobby Junkie
|
|
Join Date: Dec 08, 2009
Location: Perkasie, PA
Posts: 1,967
|
|
Here's one of mine. 
__________________
Cori C-R
PS - This is what part of the alphabet would look like if Q and R were eliminated.
To view links or images in signatures your post count must be 5 or greater. You currently have 0 posts.
To view links or images in signatures your post count must be 5 or greater. You currently have 0 posts.
|
2013-05-28, 8:49pm
|
 |
Member
|
|
Join Date: May 03, 2008
Location: Frederick, MD
Posts: 90
|
|
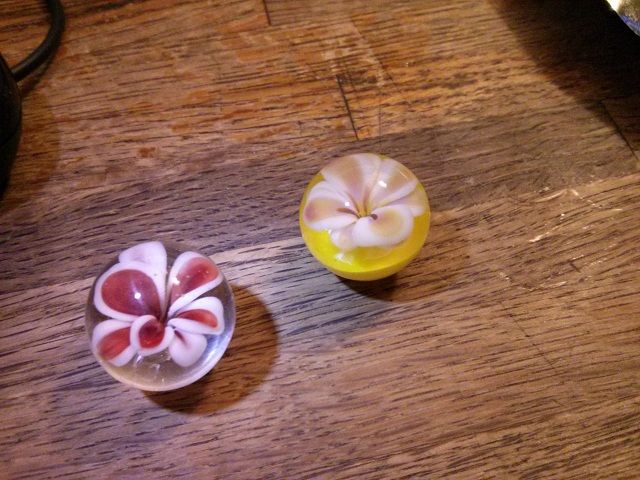
Thank you all very much for such helpful information. Especially for the tip for how to fix the dimple. I've been working on floral implosions for a year with mixed results. This information really helped me improve. Here are some of my latest marbles.


__________________
Julie Delaney, Stained and Flamed
Bethlehem Barracuda with tanked Oxygen
|
2013-05-29, 4:45am
|
|
Flamewoman
|
|
Join Date: Jan 12, 2007
Location: California
Posts: 985
|
|
Yes! Nice work Julie! Glad my tip helped. Otter's drawings are the best at explaining.
__________________
Mary K
GTT Sidewinder & 3 Regalias
To view links or images in signatures your post count must be 5 or greater. You currently have 0 posts.
You cannot do a kindness too soon, for you never
know how soon it will be too late.
To view links or images in signatures your post count must be 5 or greater. You currently have 0 posts.
PLEASE like my page!
|
2013-06-01, 8:51am
|
|
Member
|
|
Join Date: Jun 16, 2008
Posts: 47
|
|
__________________
-Max
To view links or images in signatures your post count must be 5 or greater. You currently have 0 posts.
|
2013-06-03, 8:51pm
|
|
Member
|
|
Join Date: May 10, 2013
Location: seattle
Posts: 80
|
|
So many great flowers! I really like the orchid. Very beautiful.
Here is one from me:
|
2013-06-03, 11:44pm
|
 |
Senior Member
|
|
Join Date: Mar 06, 2011
Location: SF bay area
Posts: 1,470
|
|
what I great, there is lots of wonderful tips and info here.
makes me wish I could torch more.
these are a few of mine, a recent marble and a large paper weight I did a while back


__________________
Morgan
Bethlehem Champion
To view links or images in signatures your post count must be 5 or greater. You currently have 0 posts.
To view links or images in signatures your post count must be 5 or greater. You currently have 0 posts.
To view links or images in signatures your post count must be 5 or greater. You currently have 0 posts.
To view links or images in signatures your post count must be 5 or greater. You currently have 0 posts.
#C-151
|
2013-06-04, 9:13am
|
|
Senior Member
|
|
Join Date: Jan 29, 2009
Posts: 1,958
|
|
That last one that Morgan posted is in my collection now so beautiful.
__________________
To view links or images in signatures your post count must be 5 or greater. You currently have 0 posts.
To view links or images in signatures your post count must be 5 or greater. You currently have 0 posts.
To view links or images in signatures your post count must be 5 or greater. You currently have 0 posts.
|
2013-06-05, 6:23pm
|
|
Hobby Junkie
|
|
Join Date: Dec 08, 2009
Location: Perkasie, PA
Posts: 1,967
|
|
Here's a bubble trap Strawflower from yesterday.

And a chrysanthemum bubble trap from Tuesday.

This one isn't a flower, but the technique is the same. Splash!!!

__________________
Cori C-R
PS - This is what part of the alphabet would look like if Q and R were eliminated.
To view links or images in signatures your post count must be 5 or greater. You currently have 0 posts.
To view links or images in signatures your post count must be 5 or greater. You currently have 0 posts.
|
2013-06-06, 7:01pm
|
|
Flamewoman
|
|
Join Date: Jan 12, 2007
Location: California
Posts: 985
|
|
So Cori....love your work much. How do you do the big bubbletrap? & what size clear are you using? You must have alot more heat than I do, those look big. I love the chrysanthemum bubble trap from tuesday, is that glass MP Plum? Love that one.
Actually I love them all, very nice.
__________________
Mary K
GTT Sidewinder & 3 Regalias
To view links or images in signatures your post count must be 5 or greater. You currently have 0 posts.
You cannot do a kindness too soon, for you never
know how soon it will be too late.
To view links or images in signatures your post count must be 5 or greater. You currently have 0 posts.
PLEASE like my page!
|
2013-06-07, 3:08pm
|
|
Member
|
|
Join Date: Jun 16, 2008
Posts: 47
|
|
Are bubble traps done with a pick? Can they be done well on tubing or is it mostly a rod/compression technique? I've not tried them yet but they are oh so cool... especially the single bubble - the reflection on the first one is totally awesome!
__________________
-Max
To view links or images in signatures your post count must be 5 or greater. You currently have 0 posts.
|
2013-06-07, 4:32pm
|
|
Hobby Junkie
|
|
Join Date: Dec 08, 2009
Location: Perkasie, PA
Posts: 1,967
|
|
Thanks for the compliments! They really mean a lot!
Mary- I am using 19 mm clear. The chrysanthemum is actually GA Triple Passion frit (coarse).
Max- the bubble pattern is created using a flower arranging "frog" from ACMoore craft store. After smooshing the Maria onto it, I cover each hole with a dot of clear.
Mary- The big bubble is a large hole made with either a brass tool I have (Trey's poke and tamp tool) or a graphite rod. Both work, it just depends which is closer to me on the bench at the time. I then cover the hole with a large blob of clear and melt it in.
Max- I am only using rod right now. My tubing skills stink. I'm hoping to improve them this year.
__________________
Cori C-R
PS - This is what part of the alphabet would look like if Q and R were eliminated.
To view links or images in signatures your post count must be 5 or greater. You currently have 0 posts.
To view links or images in signatures your post count must be 5 or greater. You currently have 0 posts.
|
|
Currently Active Users Viewing This Thread: 1 (0 members and 1 guests)
|
|
|
 Posting Rules
|
You may not post new threads
You may not post replies
You may not post attachments
You may not edit your posts
HTML code is Off
|
|
|
All times are GMT -7. The time now is 1:53am.
|


