

|
| The Dark Room -- Photo Editing and Picture Taking. Advice, tutorials, questions on all things photoshop, photo editing, and taking pictures of beads or glass. |

2010-02-02, 3:52pm
|
 |
Frustrated Artist
|
|
Join Date: Jul 10, 2007
Posts: 345
|
|
 How to make the backgrounds white
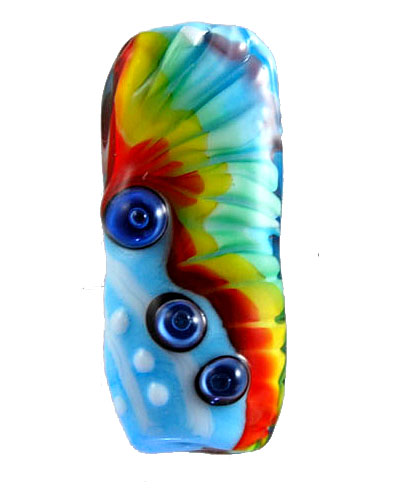
I took these with a white background. What are the steps in photoshop to make the background white without making the bead look like it has holes in it?
Thanks in advance
D
 
__________________
Davina-Marie
To view links or images in signatures your post count must be 5 or greater. You currently have 0 posts.
To view links or images in signatures your post count must be 5 or greater. You currently have 0 posts.
To view links or images in signatures your post count must be 5 or greater. You currently have 0 posts.
To view links or images in signatures your post count must be 5 or greater. You currently have 0 posts.
To view links or images in signatures your post count must be 5 or greater. You currently have 0 posts.
|
2010-02-02, 4:10pm
|
 |
Jacqueline Parkes
|
|
Join Date: Nov 04, 2005
Location: Vancouver, Canada
Posts: 4,497
|
|
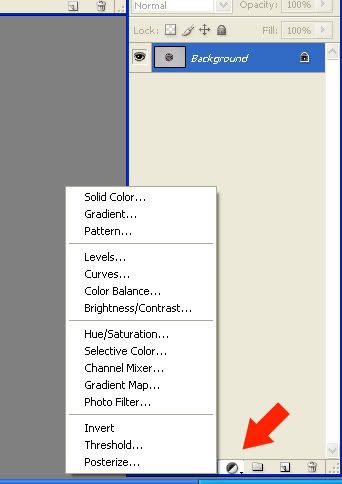
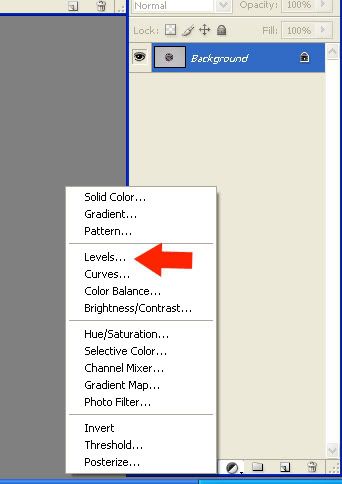
You will be amazed at how easy it is.
Press cntrl and L
Click the far right arrow (set white point)
Click on the picture where your white background should be
__________________
To view links or images in signatures your post count must be 5 or greater. You currently have 0 posts.
To view links or images in signatures your post count must be 5 or greater. You currently have 0 posts.
To view links or images in signatures your post count must be 5 or greater. You currently have 0 posts.
|
2010-02-02, 4:13pm
|
|
Jacqueline Parkes
|
|
Join Date: Nov 04, 2005
Location: Vancouver, Canada
Posts: 4,497
|
|
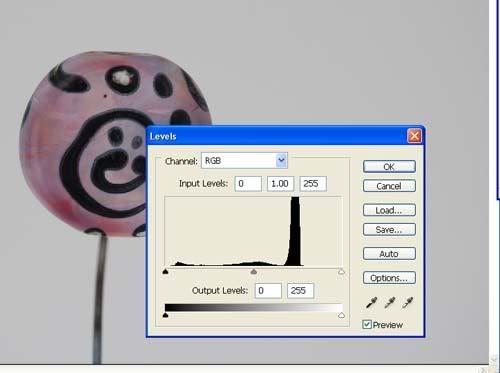
I tried it with your picture. I hope you don't mind.
It appears I still have some learning to do though as it distorted the color of your bead. Maybe someone will jump in here because when I tried to fix it with changing other settings, I did not have much luck.

__________________
To view links or images in signatures your post count must be 5 or greater. You currently have 0 posts.
To view links or images in signatures your post count must be 5 or greater. You currently have 0 posts.
To view links or images in signatures your post count must be 5 or greater. You currently have 0 posts.
|
2010-02-02, 4:40pm
|
|
Senior Member
|
|
Join Date: Mar 18, 2008
Location: Hillsboro, OR
Posts: 674
|
|
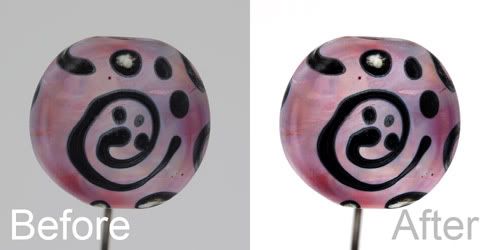
The easiest way to fix this one is to start off with a background that is properly lit and about 1 to 1.5 fstops hotter than the exposure on the bead. That will give you a good white background.
The other way is to extract the bead and put it on another background... which is what I did.
Still not perfect though. I used Photoshop CS2, used the Magic Wand to select all of the background (since it was mostly one even gray tone) did a inverse to change the selection of the background to the bead, did a copy, created a new canvas with a white background and pasted the bead onto the new canvas. I then tweaked the contrast and levels a bit. Doing this with the original full size image will work a lot better.
Mike
__________________
It's said that there is an artist inside each of us...unfortunately, mine left years ago and I've not seen him since.
|
2010-02-02, 4:42pm
|
 |
"Sinners have soul too"
|
|
Join Date: Jun 26, 2005
Location: The beachy part of So Cal
Posts: 4,258
|
|

It's harder for me to adjust images of other peoples stuff because I don't know what the colors are really supposed to be.
__________________
Donna
To view links or images in signatures your post count must be 5 or greater. You currently have 0 posts.
*
To view links or images in signatures your post count must be 5 or greater. You currently have 0 posts.
*
To view links or images in signatures your post count must be 5 or greater. You currently have 0 posts.
*
|
2010-02-02, 6:40pm
|
 |
Member
|
|
Join Date: Jul 20, 2009
Location: Shelton
Posts: 36
|
|
To get a good white background, make sure you diffuse the light. That will help spread the light across the background evenly and cut down on any shadows. But when you do use a diffuser it will darken the photo so you need a longer shutter speed. Take a few shots with different exposures from too dark to light. And that will give you a good selection of images to choose from. Do not crop yet. You need to keep it full size or the color can get grainy.
Dont pick the photo with the whitest background; look for the image that matches your bead the best.
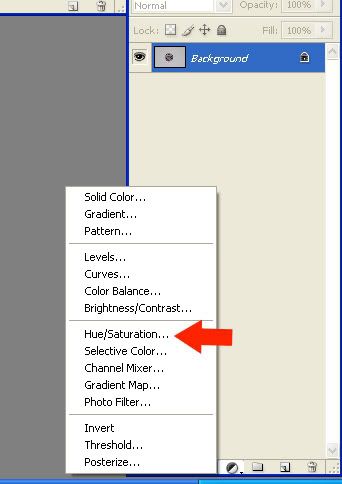
If you are using phoroshop use Adjustment layers to change the Levels, and Hue/Saturation. This will give you more control of the adjustments because they are on there own layer and masks.
In most cases you would use the white dropper on the side and pick the background. After that use the dark, midtone and light sliders to adjust the level of contrast that looks good to you.
  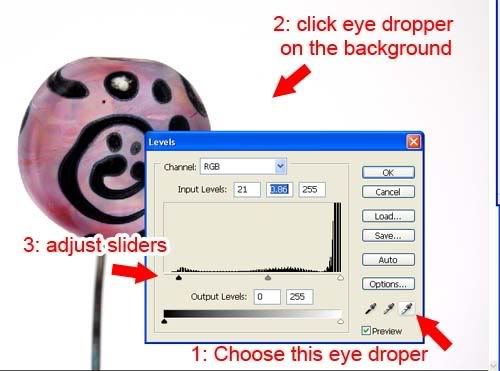
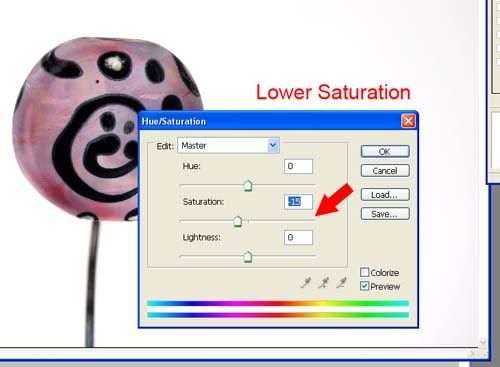
After you set the levels layers create a adjustment layer for hue saturation. The color is probably over saturated so on the middle slider, lower the Saturation just a little. This will give it a more realistic look.
Flatten your layers, crop it and its ready to posted with a solid whit background.
__________________
To view links or images in signatures your post count must be 5 or greater. You currently have 0 posts.
To view links or images in signatures your post count must be 5 or greater. You currently have 0 posts.
It's not the Camera that takes the photo, it's the photographer.
|
2010-02-03, 12:37pm
|
 |
ManBearPig
|
|
Join Date: Jun 28, 2005
Location: Roanoke, VA
Posts: 8,540
|
|
You need more light in your photo. Extend the exposure length.
Take several pictures of the same bead with the same lighting, each time increasing the exposure one step. Then look at the pictures and see which one looks the best to you.
__________________
To view links or images in signatures your post count must be 5 or greater. You currently have 0 posts.
To view links or images in signatures your post count must be 5 or greater. You currently have 0 posts.
To view links or images in signatures your post count must be 5 or greater. You currently have 0 posts.
To view links or images in signatures your post count must be 5 or greater. You currently have 0 posts.
To view links or images in signatures your post count must be 5 or greater. You currently have 0 posts.
|
2010-02-03, 1:41pm
|
 |
Experimentalist
|
|
Join Date: Nov 15, 2005
Location: Penryn, California
Posts: 6,758
|
|
Well done, Keith!
__________________
To view links or images in signatures your post count must be 5 or greater. You currently have 0 posts.
To view links or images in signatures your post count must be 5 or greater. You currently have 0 posts.
To view links or images in signatures your post count must be 5 or greater. You currently have 0 posts.
|
2010-02-05, 10:44am
|
|
Senior Member
|
|
Join Date: Feb 08, 2006
Location: Palmdale, California
Posts: 7,589
|
|
Also, your camera should have a "set white point" on it. When you find it, take a picture of the background it is on. That's to set the white point that way. Works okay but I still struggle on some of the custom settings..it all seems to revert back to the old way!
__________________
Irene
To view links or images in signatures your post count must be 5 or greater. You currently have 0 posts.
|
2010-03-05, 10:36am
|
|
Junior Member
|
|
Join Date: Oct 02, 2009
Posts: 1
|
|
Thanks for the good ideas on using PS's layers to create a white background and then adjust the beads' saturation. I tried it and it sure is much faster than trying to use those darned selection tools, inverting, etc. The only thing I would add is that I almost never flatten an image because it is destructive: I wouldn't be able to go back later to make changes to the layers. I usually just save as both a PSD which retains the layers and a jpeg which makes the image versatile for sharing.
|
2010-03-26, 9:21pm
|
|
No Longer an LE Member
|
|
Join Date: Mar 26, 2010
Posts: 3
|
|
If I need a pure white background I do the best I can with lights on seamless paper, then just delete the background leaving pure white in photoshop. This saves me the trouble of trying to get the corners perfectly white, I just delete them.
|
|
Currently Active Users Viewing This Thread: 1 (0 members and 1 guests)
|
|
|
 Posting Rules
|
You may not post new threads
You may not post replies
You may not post attachments
You may not edit your posts
HTML code is Off
|
|
|
All times are GMT -7. The time now is 9:52pm.
|


